1.はじめに
今回ご紹介するのは、音声と1枚の顔画像を使って、顔画像がまるで話しているような動画を作成するOne Shot Talking Faceという技術です。
*この論文は、2022.12に提出されました。
2.One Shot Talking Face とは?
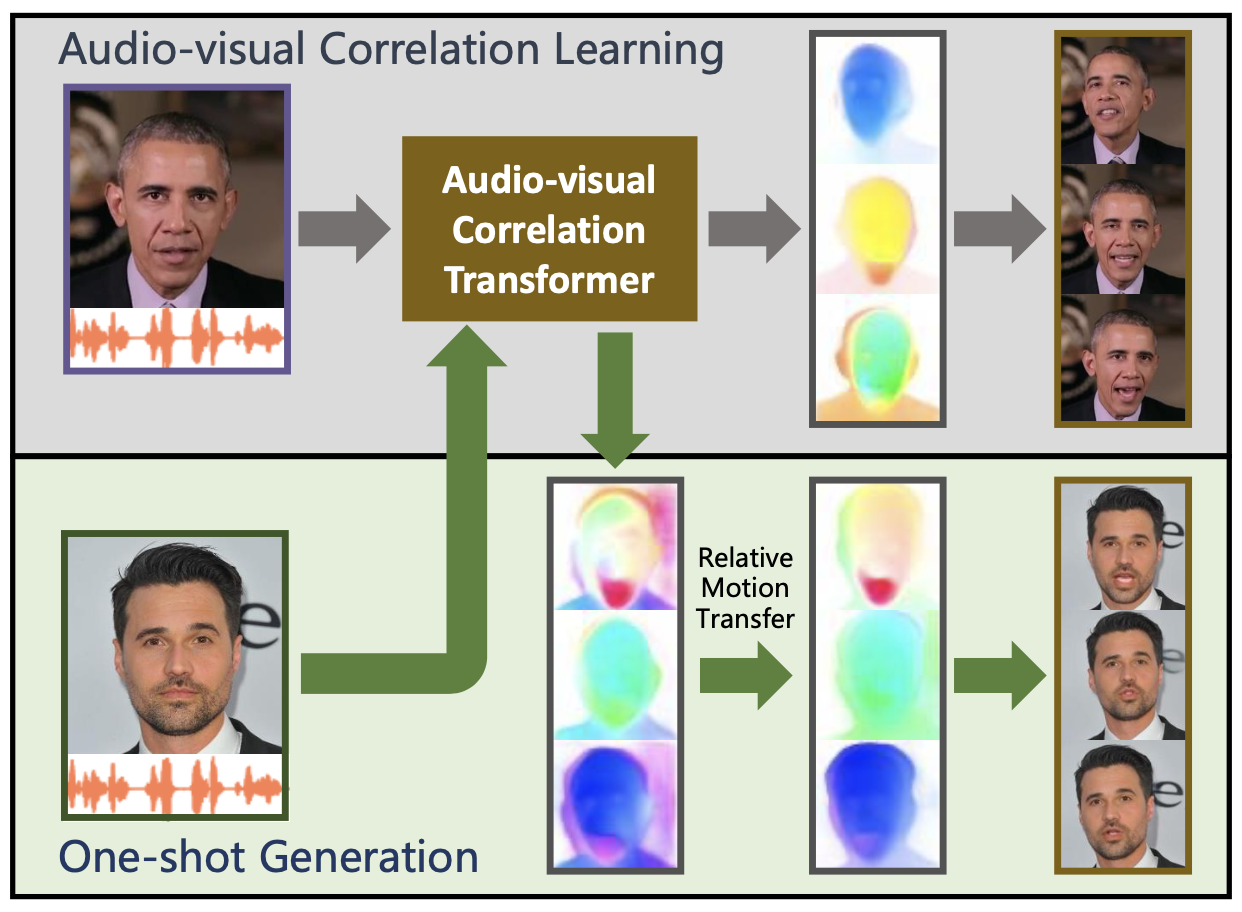
下記が、One Shot Talking Faceの概略図です。まず、上段のAudio-visual Correlation Leraning(音声と画像の相関性学習)を行います。 特定話者の音声と顔のキーポイントの動きとの相関性をAudio-visual Correlation Transformer に学習させます。
学習後は、One-shot Generation(音声と一枚の顔画像から動画作成)を行います。音声と1枚の顔画像をAudio-visual Correlation Transformerに入力すると顔のキーポイントの動きが予測が得られます。これをRelative Motion Transfer で時系列の連続性なども考慮して完成度を上げています。
3.コード
コードはGoogle Colabで動かす形にしてGithubに上げてありますので、それに沿って説明して行きます。自分で動かしてみたい方は、この「リンク」をクリックし表示されたノートブックの先頭にある「Open in Colab」ボタンをクリックすると動かせます。
まず、セットアップを行います。
|
1 2 3 4 5 6 7 8 9 10 11 12 13 14 |
#@title #**Setup** !git lfs install %cd /content !git clone https://huggingface.co/camenduru/pocketsphinx-20.04-t4 pocketsphinx %cd /content/pocketsphinx !sudo cmake --build build --target install %cd /content !git clone https://huggingface.co/camenduru/one-shot-talking-face-20.04-t4 one-shot-talking-face %cd /content/one-shot-talking-face !pip install -r /content/one-shot-talking-face/requirements.txt !chmod 755 /content/one-shot-talking-face/OpenFace/FeatureExtraction !mkdir /content/out !apt install -qq libgtk2.0-0 jq -y !pip install -q imageio-ffmpeg |
それでは、サンプルの音声と顔画像を使って、動画を作成してみましょう。wav_file_nameにはone-shot-talking-face/samples/audiosフォルダにあるwavファイル名を記入し、image_file_nameにはone-shot-talking-face/samples/imgsフォルダにあるjpgファイル名を記入して実行します。ここでは、wav_file_nameにはobama2.wav、image_file_nameにはpaint.jpgを設定しています。
自分の用意した音声や顔画像を使用したい場合は、上記2つのフォルダにそれぞれアップロードして下さい。なお、音声はモノラル・ビットレート16000で60秒位を目安に(長いとエラーになります)、顔画像は256×256ピクセルのものを使用して下さい。
|
1 2 3 4 5 6 7 8 9 10 11 12 13 14 15 16 17 18 19 20 21 22 23 24 25 26 27 28 29 30 31 32 33 34 35 36 37 38 39 40 41 |
#@title #**make movie** import os, random, torchaudio from IPython.display import HTML from base64 import b64encode from IPython.display import clear_output def show_video(video_path, video_width = 256): video_file = open(video_path, "r+b").read() video_url = f"data:video/mp4;base64,{b64encode(video_file).decode()}" return HTML(f"""""") #@markdown -Select wav_file_name from the one-shot-talking-face/samples/audios folder.\ #@markdown -Select image_file_name from the one-shot-talking-face/samples/imgs folder. wav_file_name = 'obama2.wav' #@param {type:"string"} image_file_name = 'paint.jpg' #@param {type:"string"} wav_file = "/content/one-shot-talking-face/samples/audios/" + wav_file_name image_file = "/content/one-shot-talking-face/samples/imgs/" + image_file_name waveform, sample_rate = torchaudio.load(wav_file) torchaudio.save(wav_file, waveform, sample_rate, encoding="PCM_S", bits_per_sample=16) os.environ['wav_file'] = wav_file os.environ['image_file'] = image_file random_int = str(random.randint(1, 1000000)) !mkdir /content/train !cp image_file /content/train/image.png !pocketsphinx -phone_align yes single /content/train/audio.wav $text | jq '[.w[]|{word: (.t | ascii_upcase | sub(""; "sil") | sub(""; "sil") | sub("\(2\)"; "") | sub("\(3\)"; "") | sub("\(4\)"; "") | sub("\[SPEECH\]"; "SIL") | sub("\[NOISE\]"; "SIL")), phones: [.w[]|{ph: .t | sub("\+SPN\+"; "SIL") | sub("\+NSN\+"; "SIL"), bg: (.b*100)|floor, ed: (.b*100+.d*100)|floor}]}]' > /content/test.json %cd /content/one-shot-talking-face !python -B test_script.py --img_path /content/train/image.png --audio_path /content/train/audio.wav --phoneme_path /content/test.json --save_dir /content/train os.environ['ran_num'] = random_int !cp /content/train/image_audio.mp4 "/content/out/${ran_num}.mp4" clear_output() show_video(f"/content/out/{random_int}.mp4") |
下記を実行すると、作成した動画をダウンロードできます(google chrome専用)
|
1 2 3 4 |
#@title #**Download movie** ( for google chrome) from google.colab import files file_path =f"/content/out/{random_int}.mp4" files.download(file_path) |
では、また。
(オリジナルgithub)https://github.com/camenduru/one-shot-talking-face-colab
(twitter投稿)






コメントを残す