
今回は、血液の顕微鏡画像から細胞を検出するSSDモデルを作ってみたいと思います。
こんにちは cedro です。
先回、SSDの学習済みモデルを使った物体検出を行ってみましたが、物体検出できるのはあらかじめ学習した20クラスだけです。
新たなクラスの物体検出をするには、どうしたら良いのでしょうか。大量のアノテーション付きデータを用意してゼロから学習するしかないのでしょうか。
そんなことはありません。SSD学習済みモデルのパラメータを初期値として使う(過去の学習経験を活かす)と、少量のデータセットを学習するだけで、新しいSSDモデルを構築できるのです。これをファインチューニングと言います。
ということで、今回は、血液の顕微鏡画像から細胞を検出するSSDモデルをファインチューニングで作ってみたいと思います。
データセットを準備します
今回、使用するデータセットは、BCCD Dataset という血液の顕微鏡写真で、白血球、赤血球、血小板の3つについてバウンディングボックスのアノテーションデータが付いたものです。
データセットの仕様が、PASCAL Visual Object Classes ですので、PyTorch のSSDモデルで簡単に読み込むことが出来ます。
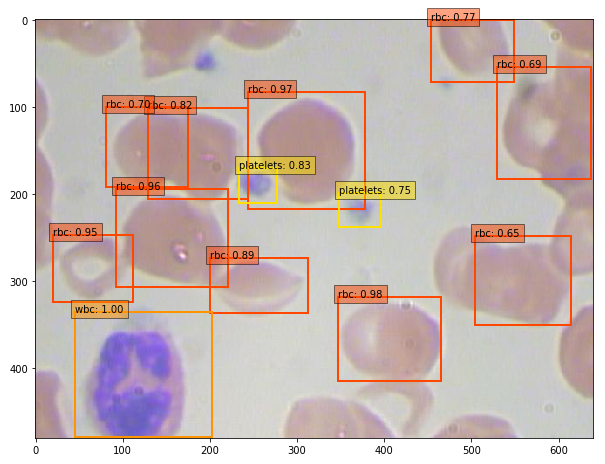
物体検出をした時のイメージは、こんな感じ。wbc が白血球、rbc が赤血球、platelets が血小板です。それにしても、なんともマニアックなデータセットですよね。
BCCD Dataset はこういった画像とアノテーションデータのセットが、全部で364個(trainval:292個、test:72個)しかない非常に小さなデータセットです。

実際に使用するのは、赤枠で囲ったBCCDフォルダーの部分です。非常にコンパクトなデータセットなので、今回はGithubのコードの中に含めてあります。
セットアップ
コードはGoogle Colabで動かす形にしてGithubに上げてありますので、それに沿って説明して行きます。自分で動かしてみたい方は、この「リンク」をクリックし表示されたノートブックの先頭にある「Colab on Web」ボタンをクリックすると動かせます。
まず、Githubからコードをコピーし、SSD学習済みモデルのパラメータをダウンロードします。ついでに、Google Colab に接続されているGPUの種類も確認しておきましょう。
|
1 2 3 4 5 6 |
# github からコードをコピー ! git clone https://github.com/cedro3/pytorch_ssd.git %cd pytorch_ssd # 学習済みパラメータをダウンロード ! wget -P weights https://s3.amazonaws.com/amdegroot-models/ssd300_mAP_77.43_v2.pth |
|
1 2 |
# GPUの種類確認 ! nvidia-smi -L |
ファインチューニングを行う前に、ダウンロードした学習済みモデルのパラメータを使ってVOCクラスの物体検出(20クラス)をやってみましょう。SSDネットワークをtestモードで定義し、学習済みモデルのパラメータを読み込みます。
そして、物体検出関数を定義し、サンプル画像(./data/person.jpg)の物体検出を行います。
|
1 2 3 4 5 6 7 8 9 10 11 12 13 14 15 16 17 18 19 20 21 22 23 24 25 26 27 28 29 30 31 32 33 34 35 36 37 38 39 40 41 42 43 44 45 46 47 48 49 50 51 52 53 54 55 56 57 58 59 60 61 62 63 64 65 66 67 68 69 70 71 72 73 74 75 76 77 |
import os import sys module_path = os.path.abspath(os.path.join('..')) if module_path not in sys.path: sys.path.append(module_path) import torch import torch.nn as nn from torch.autograd import Variable import numpy as np import cv2 from ssd import build_ssd from matplotlib import pyplot as plt from data import VOC_CLASSES as voc_labels # GPUの設定 torch.cuda.is_available() torch.set_default_tensor_type('torch.cuda.FloatTensor') device = 'cuda' if torch.cuda.is_available() else 'cpu' # SSDネットワークを定義し、学習済みパラメータを読み込む net = build_ssd('test', 300, 21) net.load_weights('./weights/ssd300_mAP_77.43_v2.pth') net = net.to(device) # 物体検出関数 def detect(image, labels): # 画像を(1,3,300,300)のテンソルに変換 rgb_image = cv2.cvtColor(image, cv2.COLOR_BGR2RGB) x = cv2.resize(image, (300, 300)).astype(np.float32) x -= (104.0, 117.0, 123.0) x = x.astype(np.float32) x = x[:, :, ::-1].copy() x = torch.from_numpy(x).permute(2, 0, 1) xx = Variable(x.unsqueeze(0)) # 順伝播を実行し、推論結果を出力 if torch.cuda.is_available(): xx = xx.cuda() y = net(xx) # 表示設定 plt.figure(figsize=(8,8)) colors = plt.cm.hsv(np.linspace(0, 1, 21)).tolist() plt.imshow(rgb_image) currentAxis = plt.gca() # 推論結果をdetectionsに格納 detections = y.data # 各検出のスケールのバックアップ scale = torch.Tensor(rgb_image.shape[1::-1]).repeat(2) # バウンディングボックスとクラス名を表示 for i in range(detections.size(1)): j = 0 # 確信度confが0.6以上のボックスを表示 # jは確信度上位200件のボックスのインデックス # detections[0,i,j]は[conf,xmin,ymin,xmax,ymax]の形状 while detections[0,i,j,0] >= 0.6: score = detections[0,i,j,0] label_name = labels[i-1] display_txt = '%s: %.2f'%(label_name, score) pt = (detections[0,i,j,1:]*scale).cpu().numpy() coords = (pt[0], pt[1]), pt[2]-pt[0]+1, pt[3]-pt[1]+1 color = colors[i] currentAxis.add_patch(plt.Rectangle(*coords, fill=False, edgecolor=color, linewidth=2)) currentAxis.text(pt[0], pt[1], display_txt, bbox={'facecolor':color, 'alpha':0.5}) j+=1 plt.show() plt.close() return detections # 物体検出実行 file = './data/person.jpg' image = cv2.imread(file, cv2.IMREAD_COLOR) detections = detect(image, voc_labels) |
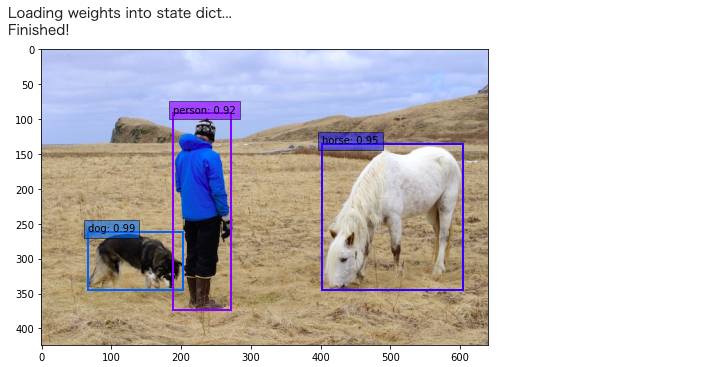
左から順に dog, person, horse が検出されていて、数字はどれだけ自信を持って検出したかの確信度(%)を表しています。
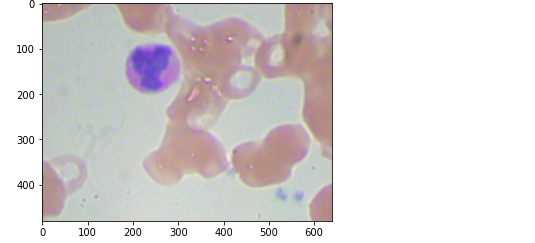
そして、BCCDデータを読み込んで表示させてみましょう。
|
1 2 3 4 5 6 7 8 9 10 11 12 |
# BCCDデータの読み込み from data import VOCDetection, VOC_ROOT, VOCAnnotationTransform testset = VOCDetection(VOC_ROOT, [('BCCD', 'test')], None, VOCAnnotationTransform()) # 10番目を指定 img_id = 10 # 画像表示 image = testset.pull_image(img_id) img = cv2.cvtColor(image, cv2.COLOR_BGR2RGB) plt.imshow(img) plt.show() |
ファインチューニング
SSD学習済みモデルのパラメータを初期値として、BCCDデータセットを使ってファインチューニングを行います。初期設定の項目は以下の様です。
- dataset : 学習に使うデータセット
- basenet : ゼロから学習する場合に使用するパラメータ(不使用)
- batch_size : バッチサイズ
- resume : ファインチューングする場合に使用するパラメータ
- max_iter : 学習回数(iter)
- num_workers : 並列処理数
- cuda : GPUの使用有無
- lr : 学習率
- lr_steps : 学習率を段階的に下げる場合の iter ポイント(不使用)
- momentum : 最適化手法(momentumSGD)のパラメータ
- weight_decay : 最適化手法(momentumSGD)のパラメータ
- gamma : 学習率を段階的に下げる場合の学習率の低減率(不使用)
- save_folder : 学習済みパラメータの読み込み・書き込みディレクトリ
ゼロから学習する場合は resume を指定せず、その場合 SSD は basenet で指定したパラメータをロードします。今回はファインチューニングなので resume を指定し、その場合SSDは resume で指定したパラメータをロードします。
学習率 lr は最初大きくし学習進行に合わせて段階的に下げると学習が安定し易いので、そのためのコードがありますが、実際には使用していません。また、今回はファインチューニングなので、パラメータの初期化は行いません。
それでは、学習を500iter実行します。GPUがP100の場合で、約10分ほど掛かります。
|
1 2 3 4 5 6 7 8 9 10 11 12 13 14 15 16 17 18 19 20 21 22 23 24 25 26 27 28 29 30 31 32 33 34 35 36 37 38 39 40 41 42 43 44 45 46 47 48 49 50 51 52 53 54 55 56 57 58 59 60 61 62 63 64 65 66 67 68 69 70 71 72 73 74 75 76 77 78 79 80 81 82 83 84 85 86 87 88 89 90 91 92 93 94 95 96 97 98 99 100 101 102 103 104 105 106 107 108 109 110 111 112 113 114 115 116 117 118 119 120 121 122 123 124 125 126 127 128 129 130 131 132 133 134 135 136 137 138 139 140 141 142 143 144 145 146 147 148 149 150 151 152 |
from data import * from utils.augmentations import SSDAugmentation from layers.modules import MultiBoxLoss from ssd import build_ssd import os import sys import time import torch import torch.nn as nn import torch.optim as optim import torch.backends.cudnn as cudnn import torch.nn.init as init import torch.utils.data as data import numpy as np import argparse import warnings warnings.filterwarnings('ignore') # 初期設定 args = {'dataset':'BCCD', 'basenet':'vgg16_reducedfc.pth', 'batch_size':32, 'resume':'ssd300_mAP_77.43_v2.pth', 'max_iter':500, 'num_workers':4, 'cuda':True, 'lr':0.001, 'lr_steps':(8000, 10000, 12000), 'momentum':0.9, 'weight_decay':5e-4, 'gamma':0.1, 'save_folder':'weights/' } # Tensor作成時のデフォルトにGPU Tensorを設定 if torch.cuda.is_available(): if args['cuda']: torch.set_default_tensor_type('torch.cuda.FloatTensor') if not args['cuda']: print("WARNING: It looks like you have a CUDA device, but aren't " + "using CUDA.\nRun with --cuda for optimal training speed.") torch.set_default_tensor_type('torch.FloatTensor') else: torch.set_default_tensor_type('torch.FloatTensor') # 訓練データの設定 cfg = voc dataset = VOCDetection(root=VOC_ROOT, transform=SSDAugmentation(cfg['min_dim'], MEANS)) # ネットワークの定義 ssd_net = build_ssd('train', cfg['min_dim'], cfg['num_classes']) device = 'cuda' if torch.cuda.is_available() else 'cpu' net = ssd_net.to(device) # 学習済みパラメータのロード if args['resume']: print('Resuming training, loading {}...'.format(args['resume'])) ssd_net.load_weights(args['save_folder'] + args['resume']) else: vgg_weights = torch.load(args['save_folder'] + args['basenet']) print('Loading base network...') ssd_net.vgg.load_state_dict(vgg_weights) # GPU設定 if args['cuda']: net = torch.nn.DataParallel(ssd_net) cudnn.benchmark = True # learning_rate の段階調整関数 def adjust_learning_rate(optimizer, gamma, step): lr = args['lr'] * (gamma ** (step)) for param_group in optimizer.param_groups: param_group['lr'] = lr # xavierの初期化関数 def xavier(param): init.xavier_uniform_(param) # パラメータ初期化関数 def weights_init(m): if isinstance(m, nn.Conv2d): xavier(m.weight.data) m.bias.data.zero_() # 新規学習時のパラメータ初期化 if not args['resume']: print('Initializing weights...') ssd_net.extras.apply(weights_init) ssd_net.loc.apply(weights_init) ssd_net.conf.apply(weights_init) # 損失関数の設定 criterion = MultiBoxLoss(cfg['num_classes'], 0.5, True, 0, True, 3, 0.5, False, args['cuda']) # 最適化手法の設定 optimizer = optim.SGD(net.parameters(), lr=args['lr'], momentum=args['momentum'], weight_decay=args['weight_decay']) # 訓練モード net.train() # データローダの設定 data_loader = data.DataLoader(dataset, args['batch_size'], num_workers=args['num_workers'], shuffle=True, collate_fn=detection_collate, pin_memory=True) # 学習ループ step_index = 0 batch_iterator = None epoch_size = len(dataset) // args['batch_size'] for iteration in range(args['max_iter']): if (not batch_iterator) or (iteration % epoch_size ==0): batch_iterator = iter(data_loader) loc_loss = 0 conf_loss = 0 # lrの調整 if iteration in args['lr_steps']: step_index += 1 adjust_learning_rate(optimizer, args['gamma'], step_index) # バッチサイズ分のデータをGPUへ images, targets = next(batch_iterator) images = images.to(device) targets = [ann.to(device) for ann in targets] # 順伝播 t0 = time.time() out = net(images) # 逆伝播 optimizer.zero_grad() loss_l, loss_c = criterion(out, targets) loss = loss_l + loss_c loss.backward() optimizer.step() t1 = time.time() loc_loss += loss_l.item() conf_loss += loss_c.item() #ログの出力 if iteration % 10 == 0: print('timer: %.4f sec.' % (t1 - t0)) print('iter ' + repr(iteration) + ' || Loss: %.4f ||' % (loss.item()), end=' ') # 学習済みモデルの保存 torch.save(ssd_net.state_dict(), args['save_folder'] + '' + args['dataset'] + '.pth') |

学習が完了したら、学習済みパラメータを使って物体検出をしてみましょう。
SSDをtestモードで定義し、先程ファインチューニングしたパラメータ ./weights/BCCD.pth をロードします。そして、BCCDのテストデータの画像を関数 detect() で物体検出を行います。
|
1 2 3 4 5 6 7 8 9 10 11 12 13 14 15 16 17 18 19 20 21 22 23 24 25 26 27 28 |
import os import sys import torch import torch.nn as nn import torch.backends.cudnn as cudnn from torch.autograd import Variable import numpy as np import cv2 if torch.cuda.is_available(): torch.set_default_tensor_type('torch.cuda.FloatTensor') from ssd import build_ssd # SSDネットワークの定義とパラメータのロード net = build_ssd('test', 300, 21) net.load_weights('./weights/BCCD.pth') # BCCD_test 読み込み from data import VOCDetection, VOC_ROOT, VOCAnnotationTransform from data import BCCD_CLASSES as bccd_labels testset = VOCDetection(VOC_ROOT, [('BCCD', 'test')], None, VOCAnnotationTransform()) # 画像の読み込み img_id = 42 image = testset.pull_image(img_id) # 物体検出 detections = detect(image, bccd_labels) |

学習データがたった292個、学習回数も僅か500iter ですが、ちゃんと物体検出出来ています。もう1つやってみましょう。
|
1 2 3 4 5 6 |
# 画像の読み込み img_id = 55 image = testset.pull_image(img_id) # 物体検出 detections = detect(image, bccd_labels) |

では、また。


すみません! cedro様
ご丁寧なご回答ありがとうございます。
せっかくご回答いただきましたのに、今日の今日まで cedro様の回答にすら気づかず、、、
githubにデータあげてくださってありがとうございます!
なんとか四苦八苦しながら、clolabで動かせたので、これから学習したpthで画像認識をしてみます!
takumaさん
コメントありがとうございます。
動いたとのこと、よかったです。
ありがとうございました!!