1.はじめに
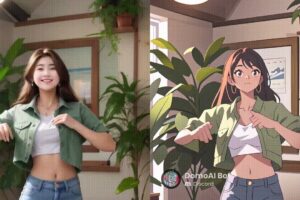
顔画像をアニメ化する手法は色々提案されていますが、今回ご紹介するのは SwapAE(Swapping AutoEncoder) を利用して顔画像をアニメ化する手法です。
*SwapAEの論文は、2020.7に提出されました。
2.SwapAE とは?
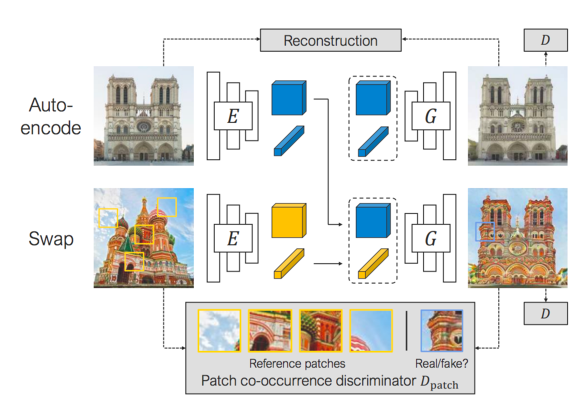
下記が SwapAEの概略で、Auto-encoder と Swap の2つのコンポーネントで構成されています。Auto-encoder は、エンコーダによって画像を構造とテクスチャーに埋め込み、デコーダによって元の画像に戻すことを学習します。
一方、Swapは、エンコーダによって異なる画像を構造とテクスチャーに埋め込みますが、デコーダは Auto-encoder の構造と Swap のテクスチャから画像を生成し、入力画像と出力画像を小さなパッチの単位で同じようにすることを学習します。
学習が完了すると、ある画像の構造は変化させず、テクスチャだけ他の画像のものと入れ替える画像編集が可能になります。
では、早速コードを動かしてみましょう。
3.コード
コードはGoogle Colabで動かす形にしてGithubに上げてありますので、それに沿って説明して行きます。自分で動かしてみたい方は、この「リンク」をクリックし表示されたノートブックの先頭にある「Colab on Web」ボタンをクリックすると動かせます。
まず、セットアップを行います。学習済みパラメータは、 韓国/NAVER社のweb漫画を元に stylegan2 で作られた naver-webtoon-faces と SwapAE をダウンロードします。
|
1 2 3 4 5 6 7 8 9 10 11 12 |
# githubからコードをコピー ! git clone https://github.com/bryandlee/naver-webtoon-faces.git %cd naver-webtoon-faces # 学習済みパラメータのダウンロード import gdown gdown.download('https://drive.google.com/uc?id=1gJ5WPFQIN26xYbujrEAKxG7YduE9S6ch', './checkpoint.zip', quiet=False) ! unzip checkpoint.zip # resultsフォルダーを作成 import os os.makedirs('results', exist_ok=True) |
|
1 2 3 4 5 6 7 8 9 10 11 12 13 14 15 16 17 18 19 20 21 22 23 24 25 26 27 28 29 30 31 32 33 34 35 36 37 38 39 40 41 42 43 44 45 46 |
# 関数定義 import os import cv2 import matplotlib.pyplot as plt import torch import random import numpy as np from tqdm import tqdm def load_image(path, size): image = image2tensor(cv2.cvtColor(cv2.imread(path), cv2.COLOR_BGR2RGB)) w, h = image.shape[-2:] if w != h: crop_size = min(w, h) left = (w - crop_size)//2 right = left + crop_size top = (h - crop_size)//2 bottom = top + crop_size image = image[:,:,left:right, top:bottom] if image.shape[-1] != size: image = torch.nn.functional.interpolate(image, (size, size), mode="bilinear", align_corners=True) return image def image2tensor(image): image = torch.FloatTensor(image).permute(2,0,1).unsqueeze(0)/255. return (image-0.5)/0.5 def tensor2image(tensor): tensor = tensor.clamp(-1., 1.).detach().squeeze().permute(1,2,0).cpu().numpy() return tensor*0.5 + 0.5 def imshow(img, size=5, cmap='jet'): plt.figure(figsize=(size,size)) plt.imshow(img, cmap=cmap) plt.axis('off') plt.show() def horizontal_concat(imgs): return torch.cat([img.unsqueeze(0) for img in imgs], 3) device = 'cuda:0' image_size = 256 torch.set_grad_enabled(False) |
|
1 2 3 4 5 6 7 8 9 10 11 12 13 14 15 16 |
# SwapAEモデルのロード from model import Encoder, Generator ae_model_path = './checkpoint/002000.pt' encoder = Encoder(32).to(device) generator = Generator(32).to(device) ckpt = torch.load(ae_model_path, map_location=device) encoder.load_state_dict(ckpt["e_ema"]) generator.load_state_dict(ckpt["g_ema"]) encoder.eval() generator.eval() print(f'[SwapAE model loaded] {ae_model_path}') |
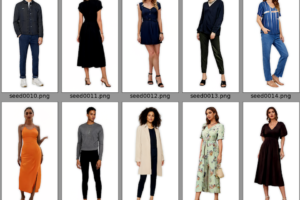
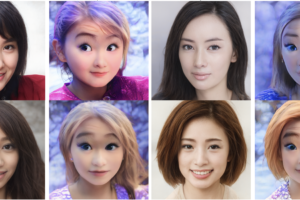
それでは、naver-webtoon-faces のアニメ出力を使って、SwapAE でテクスチャの入れ替えを行なってみましょう。
|
1 2 3 4 5 6 7 8 9 10 11 12 13 14 15 16 17 18 19 20 21 22 23 24 25 26 27 28 29 30 31 32 33 34 35 36 |
from stylegan2.model import Generator as StyleGAN stylegan_model_path = './checkpoint/stylegan2-naverwebtoon-800k.pt' stylegan_ckpt = torch.load(stylegan_model_path, map_location=device) latent_dim = stylegan_ckpt['args'].latent stylegan = StyleGAN(image_size, latent_dim, 8).to(device) stylegan.load_state_dict(stylegan_ckpt["g_ema"], strict=False) stylegan.eval() print(f'[StyleGAN2 generator loaded] {stylegan_model_path}\n') truncation = 0.7 trunc = stylegan.mean_latent(4096).detach().clone() num_samples = 8 latent = stylegan.get_latent(torch.randn(num_samples, latent_dim, device=device)) imgs_gen, _ = stylegan([latent], truncation=truncation, truncation_latent=trunc, input_is_latent=True, randomize_noise=True) print("StyleGAN2 generated images:") imshow(tensor2image(horizontal_concat(imgs_gen)), size=20) structures, textures = encoder(imgs_gen) recon_results = generator(structures, textures) print("SwapAE reconstructions:") imshow(tensor2image(horizontal_concat(recon_results)), size=20) print("Swapping results:") swap_results = generator(structures, textures[0].unsqueeze(0).repeat(num_samples,1)) imshow(tensor2image(horizontal_concat(swap_results)), size=20) |

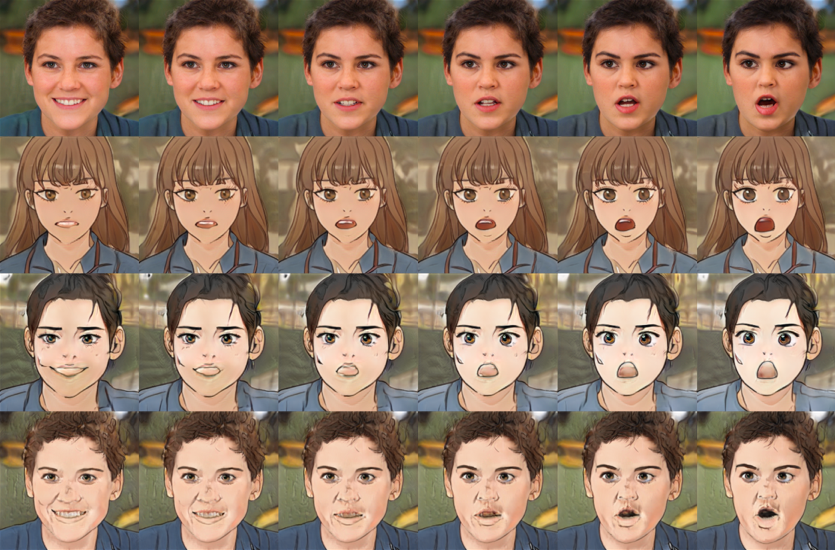
1行目が naver-webtoon-faces のアニメ出力、2行目が SwapAE の Auto-encoder 出力 でこれは1行目と同じですね。3行目が SwapAE の swap 出力ということで、2〜8列目のテクスチャが1列目のものと入れ替わっています。
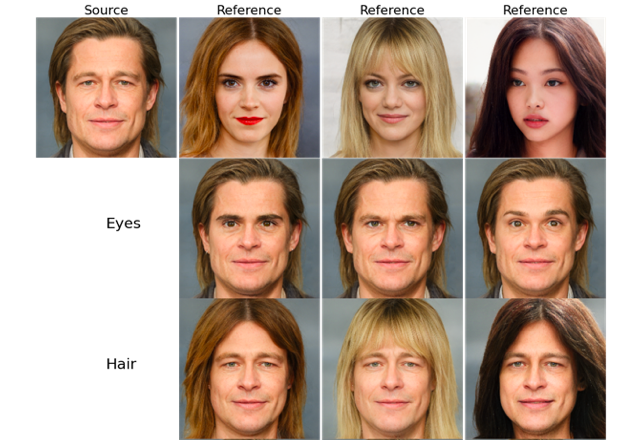
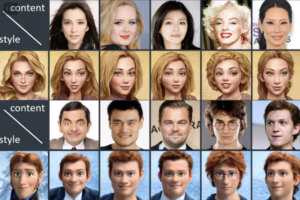
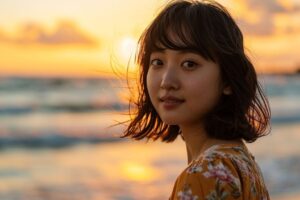
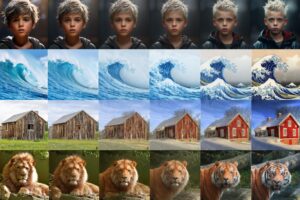
StyleGAN2は、テクスチャを入れ替えるロケーションを選択することによって効果が変わって来ます。ここではロケーションを変更した時の画像の変化をみてみましょう。
|
1 2 3 4 5 6 7 8 9 10 11 12 13 14 15 16 17 18 19 20 21 22 23 24 25 26 27 28 29 30 |
test_image_path = "./inputs/6.jpg" test_image = load_image(test_image_path, image_size) num_styles = 5 latent = stylegan.get_latent(torch.randn(num_styles, latent_dim, device=device)) imgs_gen, _ = stylegan([latent], truncation=truncation, truncation_latent=trunc, input_is_latent=True, randomize_noise=True) inputs = torch.cat([test_image.to(device), imgs_gen]) results = horizontal_concat(inputs.cpu()) structures, target_textures = encoder(inputs) structure = structures[0].unsqueeze(0).repeat(len(target_textures),1,1,1) source_texture = target_textures[0].unsqueeze(0).repeat(len(target_textures),1) for swap_loc in [1, 5]: textures = [source_texture for _ in range(swap_loc)] + [target_textures for _ in range(len(generator.layers) - swap_loc)] fake_imgs = generator(structure, textures, noises=0) results = torch.cat([results, horizontal_concat(fake_imgs).cpu()], dim=2) imshow(tensor2image(results), 23) cv2.imwrite('./results/out.jpg', cv2.cvtColor(255*tensor2image(results), cv2.COLOR_BGR2RGB)) |

1行目が元画像、2行目がロケーション1のテクスチャを1行目と入れ替えたもの、3行目がロケーション5のテクスチャを1行目と入れ替えたものです。ロケーションが低いほど影響度が強いことが分かります。
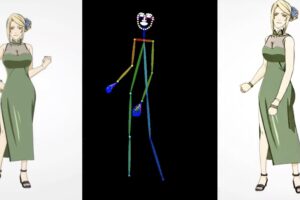
今度は、naver-webtoon-faces の補完出力を元に、ロケーション1のテクスチャを入れ替えた動画を作ってみましょう。
|
1 2 3 4 5 6 7 8 9 10 11 12 13 14 15 16 17 18 19 20 21 22 23 24 25 26 27 28 29 30 31 32 33 34 35 36 37 38 39 40 41 42 43 44 45 46 |
import imageio swap_loc = 1 num_anchors = 10 num_interp = 20 anchors = stylegan.get_latent(torch.randn(num_anchors, 512, device=device)) photo_input = test_image.to(device) ori_structure, ori_textures = encoder(photo_input) black_image = torch.zeros_like(test_image) with imageio.get_writer('results/exploration.gif', mode='I', duration=0.05, palettesize=256, subrectangles=False) as writer: for i in tqdm(range(num_anchors-1)): initial = anchors[i] final = anchors[i+1] for j in range(num_interp): latent = (float(num_interp-j) * initial + float(j) * final)/num_interp gen_img, _ = stylegan([latent], truncation=truncation, truncation_latent=trunc, input_is_latent=True, randomize_noise=True) _, target_texture = encoder(gen_img) textures = [ori_textures for _ in range(swap_loc)] + [target_texture for _ in range(len(generator.layers) - swap_loc)] swap_img = generator(ori_structure, textures, noises=0) result = torch.cat([black_image, gen_img.cpu()], 3) result = torch.cat([ result, torch.cat([test_image, swap_img.cpu()], 3) ], 2) writer.append_data((tensor2image(result)*255).astype(np.uint8)) # output.mp4をリセット if os.path.exists('./output.mp4'): os.remove('./output.mp4') # GIFからmp4を作成 ! ffmpeg -i results/exploration.gif -movflags faststart -pix_fmt yuv420p -vf "scale=trunc(iw/2)*2:trunc(ih/2)*2" output.mp4 |
|
1 2 3 4 5 6 7 8 9 10 |
# mp4動画の再生 from IPython.display import HTML from base64 import b64encode mp4 = open('./output.mp4', 'rb').read() data_url = 'data:video/mp4;base64,' + b64encode(mp4).decode() HTML(f""" <video width="50%" height="50%" controls> <source src="{data_url}" type="video/mp4"> </video>""") |
実写をアニメ化するときに、どのイメージにしようかと色々選べるので結構役に立ちそうです。
では、また。
(オリジナルGithub): https://github.com/bryandlee/naver-webtoon-faces


コメントを残す