1.はじめに
今回ご紹介するのは、1枚の画像をビデオに連動させて動かす、Thin Plate Spline Motion Model という技術です。
*この論文は、2022.3に提出されました。
2.Thin Plate Spline Motion Model とは?
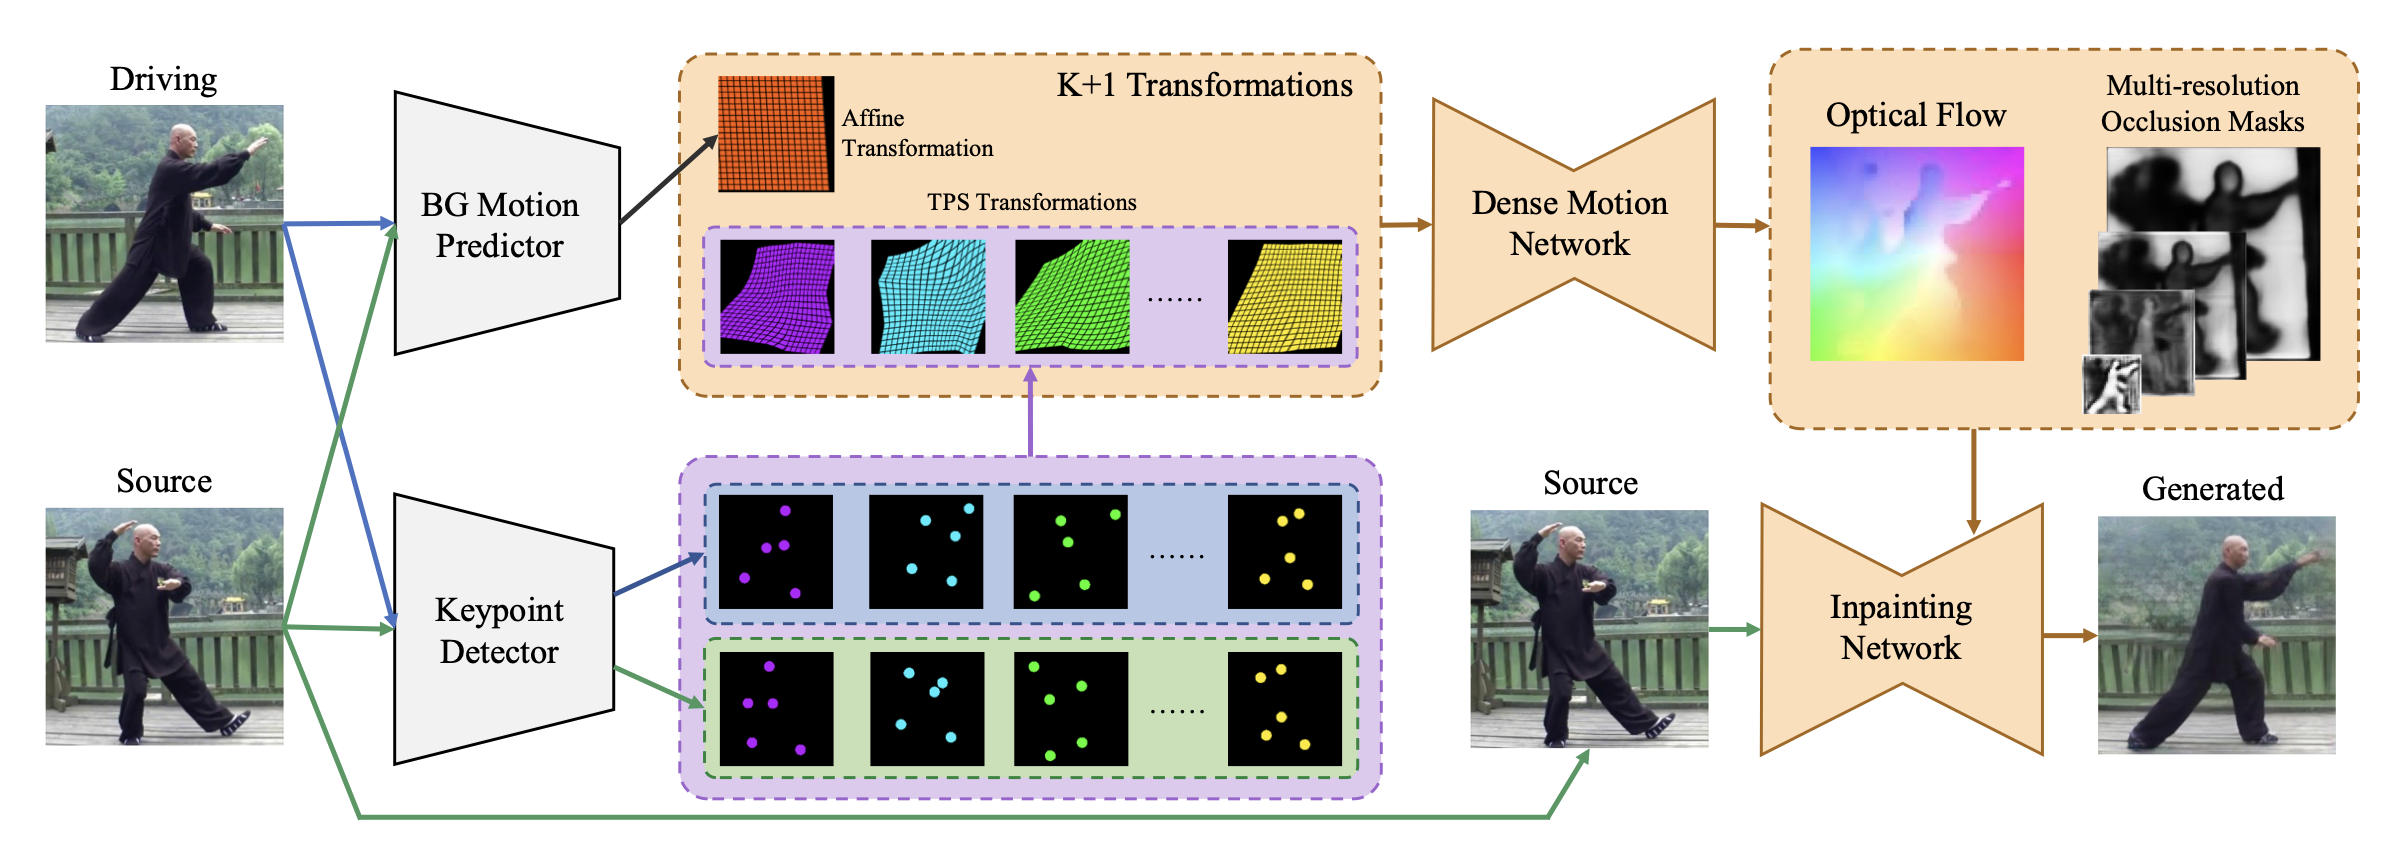
下図が、Thin Plate Spline Motion Model の概要です。まず、Driving(ドライブ画像)とSource (ソース画像)それぞれを BG Motion Predictor に入力し、ソース画像からドライブ画像への背景の動き予測します。
次に、K+1 Transformations で、ソース画像からドライブ画像を予測します。このブロックは、線形変換である Affine Transformation(アフィン変換)と柔軟な表現が可能な非線形変換である TPS Transformations(TPS変換)を組み合わせたものです。そして、Keypoint Detecor からのソース画像とドライブ画像のキーポイントの差の情報と合わせて、ソース画像からドライブ画像を予測しています。
その後、Dense Motion Network を通して得られた Optical Flow(オプチカル・フロー)とMuti-resolution Occlusion Masks(マルチ解像度のオクルージョン・マスク) を InpaintingNetwork(修正ネットワーク)へ入力し出力を得ます。この様に、様々な解像度で欠落領域の修復を行うことによって、モーション転送の完成度を上げています。
3.コード
コードはGoogle Colabで動かす形にしてGithubに上げてありますので、それに沿って説明して行きます。自分で動かしてみたい方は、この「リンク」をクリックし表示されたノートブックの先頭にある「Colab on Web」ボタンをクリックすると動かせます。
まず、セットアップを行います。チェックポイントは、デフォルトでvox.pth.tar をダウンロードし、 コメントアウト(#)を外すとted.pth.tar(上半身)、taichi.pth.tar(全身)、mgif.pth.tar(動物絵)をダンロードすることも出来ます。
|
1 2 3 4 5 6 7 8 9 10 11 12 13 14 15 16 17 18 19 20 21 22 23 24 25 26 27 28 29 30 31 32 |
#@title #**1.セットアップ** # githubからコードをコピー ! git clone https://github.com/cedro3/Thin-Plate-Spline-Motion-Model.git %cd Thin-Plate-Spline-Motion-Model # チェックポイントのダウンロード !mkdir checkpoints import gdown gdown.download('https://drive.google.com/uc?id=1-CKOjv_y_TzNe-dwQsjjeVxJUuyBAb5X', 'checkpoints/vox.pth.tar', quiet=False) #gdown.download('https://drive.google.com/uc?id=1Oy2X7DTXp8OdbMesQ6bLzJ_sR8X86DtB', 'checkpoints/ted.pth.tar', quiet=False) #gdown.download('https://drive.google.com/uc?id=1gZiUyhGZV0AYZ1G9aBtxYMxSdcBW9kc4', 'checkpoints/taichi.pth.tar', quiet=False) #gdown.download('https://drive.google.com/uc?id=1zwhsHvRt8-ymhkLXC8iglp-h7A8x7XJY', 'checkpoints/mgif.pth.tar', quiet=False) #!wget -c https://cloud.tsinghua.edu.cn/f/da8d61d012014b12a9e4/?dl=1 -O checkpoints/vox.pth.tar #!wget -c https://cloud.tsinghua.edu.cn/f/483ef53650b14ac7ae70/?dl=1 -O checkpoints/ted.pth.tar #!wget -c https://cloud.tsinghua.edu.cn/f/9ec01fa4aaef423c8c02/?dl=1 -O checkpoints/taichi.pth.tar #!wget -c https://cloud.tsinghua.edu.cn/f/cd411b334a2e49cdb1e2/?dl=1 -O checkpoints/mgif.pth.tar # ランドマークデータのダウンロード ! wget http://dlib.net/files/shape_predictor_68_face_landmarks.dat.bz2 ! bzip2 -dk shape_predictor_68_face_landmarks.dat.bz2 # 関数のインポート ! pip install pyyaml==5.4.1 ! pip install imageio==2.4.1 from function import * # downloadフォルダ作成 import os os.makedirs('examples/download') |
次に、サンプルとして保存されているソースとビデオを表示します。ビデオは先頭から10フレーム目の画像を表示しています。
ソースの仕様は jpg あるいは png で顔画像を align処理(顔のランドマークが所定の位置になるように正方形に切り抜く)をしたもので、内部処理では256×256にリサイズして扱われます。ビデオの仕様は mp4 で大体正方形になっていればOKで、同じく内部処理では256×256にリサイズして扱われます。
自分の用意したデータを使いたい場合は、ソースは後程説明する方法でアップロードして下さい。ビデオは大体正方形で音付きのものを examples/video にアップロードして下さい。
|
1 2 3 4 5 6 7 8 9 10 11 12 13 14 15 16 17 18 19 |
#@title #**2.ソースとビデオの表示** %matplotlib inline # --- 画像表示 --- print('=== source ===') display_pic('examples/source') # --- 動画表示 --- print('=== video ===') reset_folder('examples/pic_video') import glob files = sorted(glob.glob('examples/video/*.mp4')) names = [] for file in files: name = os.path.basename(file) save_frame(name, 'examples/video', 'examples/pic_video') names.append(name) display_movie('examples/pic_video', names) |

それでは、モーション転送を行ってみましょう。表示されているファイルの中から source と video にそれぞれ1つづつ選んでファイル名を記入し、実行します。ここでは、source:04.jpg, video:04.mp4 と設定し、実行します。
モーション転送は source と video の開始フレームで、顔のランドマーク位置や目や口の開け具合を大体合わせておく必要があります。また、コードの「設定」を find_best_frame = True に変更すると、source に合う video のフレームを自動的に選ぶことも出来ます。
|
1 2 3 4 5 6 7 8 9 10 11 12 13 14 15 16 17 18 19 20 21 22 23 24 25 26 27 28 29 30 31 32 33 34 35 36 37 38 39 40 41 42 43 44 45 46 47 48 49 50 51 52 53 54 55 56 57 58 59 60 61 62 63 64 65 66 67 68 69 70 71 72 73 74 75 76 77 78 79 80 81 82 83 84 85 86 87 88 89 90 91 92 93 94 95 96 97 98 99 100 101 102 103 104 105 106 107 108 109 110 111 112 113 114 115 |
#@title #**3.動画の作成** import imageio import numpy as np #import matplotlib.pyplot as plt #import matplotlib.animation as animation from skimage.transform import resize from IPython.display import HTML, clear_output import warnings import os warnings.filterwarnings("ignore") # ソースとビデオのファイル名 source = '04.jpg' #@param {"type": "string"} video = '04.mp4' #@param {"type": "string"} # 設定 import torch device = torch.device('cuda:0') dataset_name = 'vox' # ['vox', 'taichi', 'ted', 'mgif'] source_image_path = './examples/source/'+source driving_video_path = './examples/video/'+video output_video_path = './generated.mp4' config_path = 'config/vox-256.yaml' checkpoint_path = 'checkpoints/vox.pth.tar' predict_mode = 'relative' # ['standard', 'relative', 'avd'] find_best_frame = False # when use the relative mode to animate a face, use 'find_best_frame=True' can get better quality result pixel = 256 # for vox, taichi and mgif, the resolution is 256*256 if(dataset_name == 'ted'): # for ted, the resolution is 384*384 pixel = 384 if find_best_frame: !pip install face_alignment # モデルのロード from demo import load_checkpoints inpainting, kp_detector, dense_motion_network, avd_network = load_checkpoints(config_path = config_path, checkpoint_path = checkpoint_path, device = device) # ソースの読み込み source_image = imageio.imread(source_image_path) source_image = resize(source_image, (pixel, pixel))[..., :3] # ビデオの読み込み reader = imageio.get_reader(driving_video_path) fps = reader.get_meta_data()['fps'] print('fps = ', fps) #### driving_video = [] try: for im in reader: driving_video.append(im) except RuntimeError: pass reader.close() driving_video = [resize(frame, (pixel, pixel))[..., :3] for frame in driving_video] # 予測 from demo import make_animation from skimage import img_as_ubyte if predict_mode=='relative' and find_best_frame: from demo import find_best_frame as _find i = _find(source_image, driving_video, device.type=='cpu') print ("Best frame: " + str(i)) driving_forward = driving_video[i:] driving_backward = driving_video[:(i+1)][::-1] predictions_forward = make_animation(source_image, driving_forward, inpainting, kp_detector, dense_motion_network, avd_network, device = device, mode = predict_mode) predictions_backward = make_animation(source_image, driving_backward, inpainting, kp_detector, dense_motion_network, avd_network, device = device, mode = predict_mode) predictions = predictions_backward[::-1] + predictions_forward[1:] else: predictions = make_animation(source_image, driving_video, inpainting, kp_detector, dense_motion_network, avd_network, device = device, mode = predict_mode) # 画像の連結 import cv2 import numpy as np reset_folder('images') reset_folder('images2') for i in range(len(predictions)): source_img = (source_image * 255).astype(np.uint8) drive = (driving_video[i] * 255).astype(np.uint8) predict = (predictions[i] * 255).astype(np.uint8) # 横長 tmp = cv2.hconcat([source_img, drive]) img = cv2.hconcat([tmp, predict]) imageio.imwrite('images/'+str(i).zfill(6)+'.jpg', img) # スクエア black = cv2.imread('black.jpg') up = cv2.hconcat([black, source_img]) down = cv2.hconcat([drive, predict]) all = cv2.vconcat([up, down]) imageio.imwrite('images2/'+str(i).zfill(6)+'.jpg', all) # 動画作成 print('making movie...') ! ffmpeg -y -r $fps -i images/%06d.jpg -vcodec libx264 -pix_fmt yuv420p -loglevel error out.mp4 ! ffmpeg -y -r $fps -i images2/%06d.jpg -vcodec libx264 -pix_fmt yuv420p -loglevel error out2.mp4 # 音声抽出・付加 print('preparation for sound...') ! ffmpeg -y -i $driving_video_path -loglevel error sound.mp3 ! ffmpeg -y -i out.mp4 -i sound.mp3 -loglevel error output.mp4 ! ffmpeg -y -i out2.mp4 -i sound.mp3 -loglevel error output2.mp4 # 画像の再生 clear_output() display_mp4('output.mp4') |
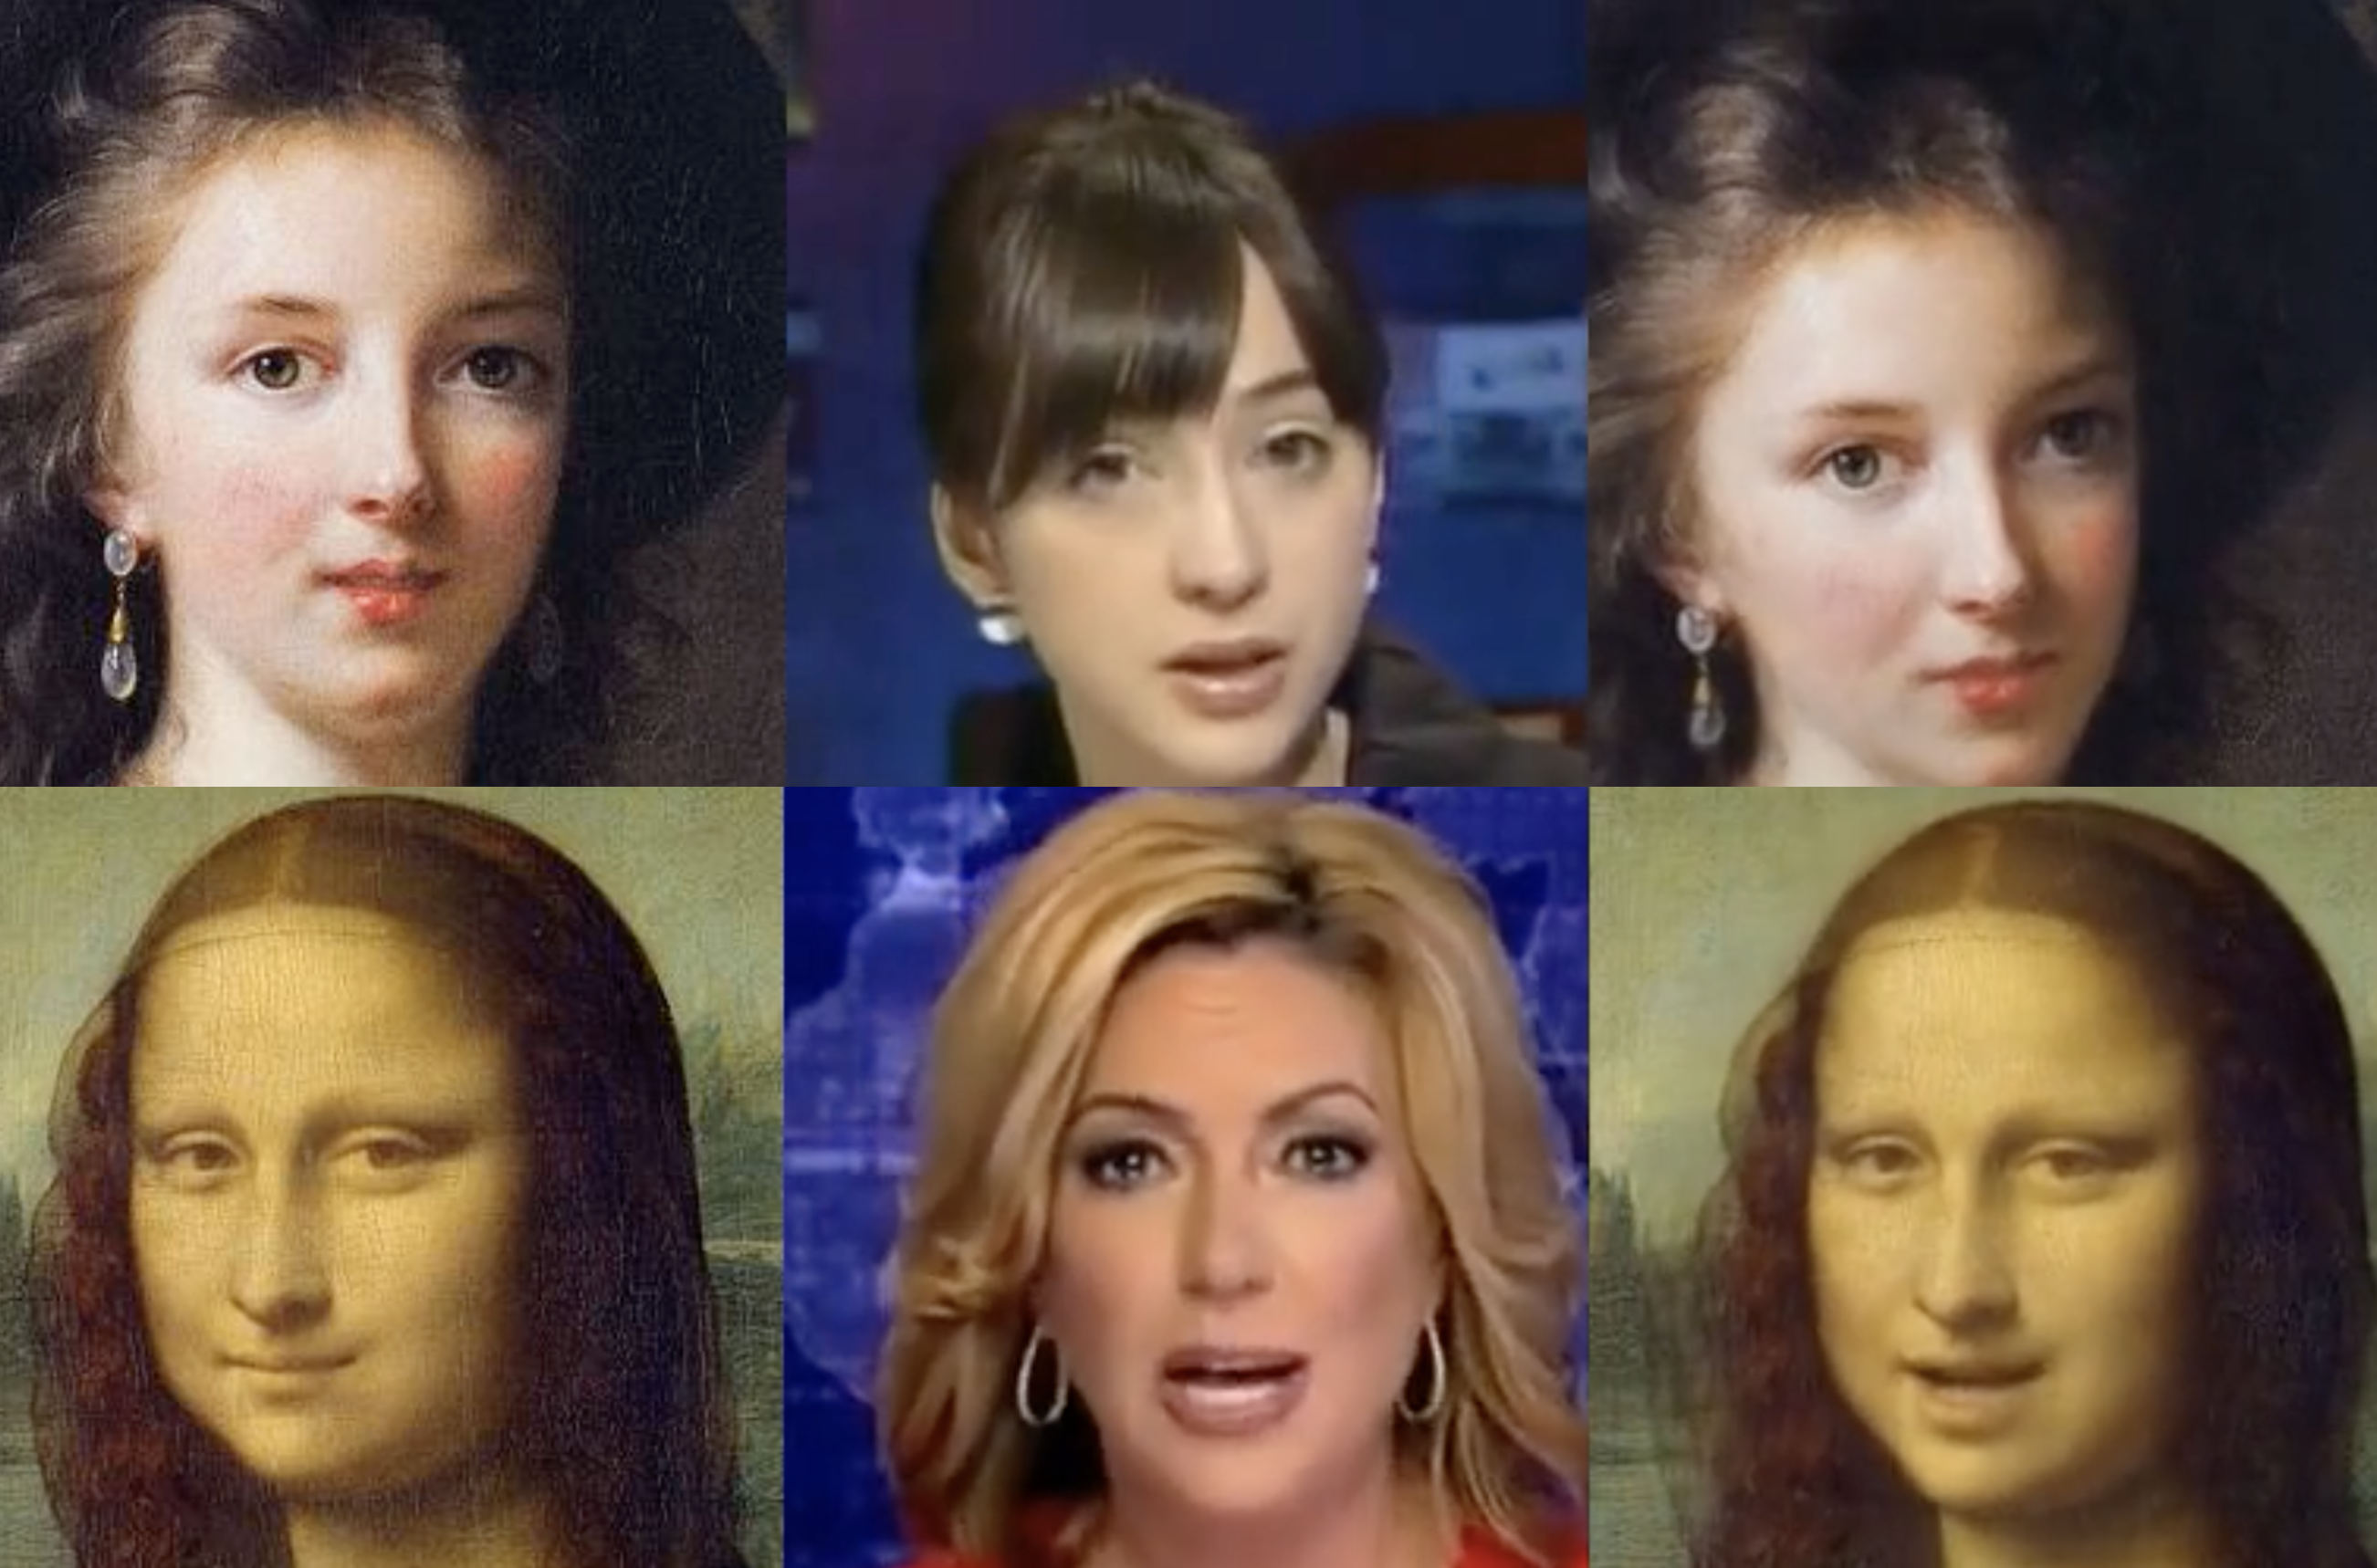
滝川クリステルからマリーアントワネットへモーション転送を行いました。かなりニッチな組み合わせですね(笑)。
作成した動画をダウンロードします。square のチェックボックスにチェックを入れないと今再生したバースタイルでダウンロードし、チェックを入れるとスクエアスタイルでダウンロードします。ここでは、スクエアスタイルでダウンロードします。
|
1 2 3 4 5 6 7 8 9 10 11 12 13 14 15 16 17 18 19 |
#@title #**4.動画のダウンロード** #@markdown ・正方形にしたい場合は、squareにチェックを入れて下さい import shutil source_name = os.path.splitext(source) video_name = os.path.splitext(video) square = True #@param {type:"boolean"} if square == True: download_name = 'examples/download/'+source_name[0]+'_'+video_name[0]+'s.mp4' shutil.copy('output2.mp4', download_name) else: download_name = 'examples/download/'+source_name[0]+'_'+video_name[0]+'b.mp4' shutil.copy('output.mp4', download_name) from google.colab import files files.download(download_name) |
別の組み合わせをやってみましょうか。今度は、source:01.jpg, video:01.mp4 です。
もう1つやってみましょう。今度は、source:05.jpg, video:05.mp4 です。
自分の用意したソースをアップロードする方法を説明します。下記を実行し、まずは写真をそのままアップロードします。ここでは例として、100.jpg〜104.jpgをアップロードしています。
|
1 2 3 4 5 6 7 8 9 10 11 12 13 14 |
#@title #**5.画像のアップロード** # ルートへ画像をアップロード from google.colab import files reset_folder('pic') uploaded = files.upload() uploaded = list(uploaded.keys()) # ルートから指定フォルダーへ移動 for file in uploaded: shutil.move(file, 'pic') %matplotlib inline display_pic('pic') |

align処理(顔のランドマークが所定の位置になるように正方形に切り抜く)を行います。
|
1 2 3 4 5 6 7 8 9 10 11 12 13 14 15 16 17 18 19 20 21 22 23 24 |
#@title #**6.顔の切り出し** import os import shutil from tqdm import tqdm import glob reset_folder('align') def run_alignment(image_path): import dlib from alignment import align_face predictor = dlib.shape_predictor("shape_predictor_68_face_landmarks.dat") aligned_image = align_face(filepath=image_path, predictor=predictor) return aligned_image files = sorted(glob.glob('pic/*.jpg')) for i, file in enumerate(tqdm(files)): input_image = run_alignment(file) input_image.resize((1024,1024)) name = os.path.basename(file) input_image.save('./align/'+name) %matplotlib inline display_pic('align') |

align処理の結果を確認して問題なければ、ソースに追加したいファイル名を1つづつ選んで add: に記入して、下記を実行します。
|
1 2 3 4 5 |
#@title #**7.ソースへ追加** add = '' #@param {type:"string"} import shutil shutil.copy('align/'+add, 'examples/source/'+add) |
では、また。
(オリジナルgithub)https://github.com/yoyo-nb/Thin-Plate-Spline-Motion-Model






tedの上半身アニメをやってみたかったのですがお手すきの際に見て頂けませんでしょうかm
この辺り編集すれば動くと思ったのですが動きませんでした
gdown.download(‘https://drive.google.com/uc?id=1Oy2X7DTXp8OdbMesQ6bLzJ_sR8X86DtB’, ‘checkpoints/ted.pth.tar’, quiet=False)
dataset_name = ‘ted’ # [‘vox’, ‘taichi’, ‘ted’, ‘mgif’]
checkpoint_path = ‘checkpoints/ted.pth.tar’
huraipanさん
ご指摘のポイントに加えて、config_path = ‘config/vox-256.yaml’ を config_path = ‘config/ted-384.yaml’ に変更し、#画像の連結のところに、black = cv2.resize(black, dsize=(384,384)) を追加すればOKです。なお、画像と動画は384×384にしてください。
詳細は、下記のcolabをご覧下さい。
https://colab.research.google.com/github/cedro3/Thin-Plate-Spline-Motion-Model/blob/main/ted_test.ipynb
早速ご確認頂きありがとうございます!
ted動きました!助かります。
Thin-Plate-Spline-Motion-Modelですが、Colabの「動画の生成」でランタイムエラーになってしまいます。設定はデフォルトの04.jpgと04.mp4を指定したままです。何が原因でしょうか?
よしのぼりさん
情報ありがとうございます。colabのpythonバージョンアップに伴うエラーでした。修正済です。再度ブログのリンクからお試しください。
ご対応ありがとうございました。
引き続き利用させていただきます。