1.はじめに
今までテキストから画像生成するモデルは、テキストで指定して特定のオブジェクト(有名なものを除く)を画像生成することが困難でした。
今回ご紹介するのは、テキストから画像を生成するモデルを、特定のオブジェクトの画像(3〜5枚程度)でファインチューニングすることによって、テキストで指定して特定のオブジェクトを画像生成できる Dream Booth という技術です。
*この論文は、2022.8に提出されました。
2.Dream Boothとは?
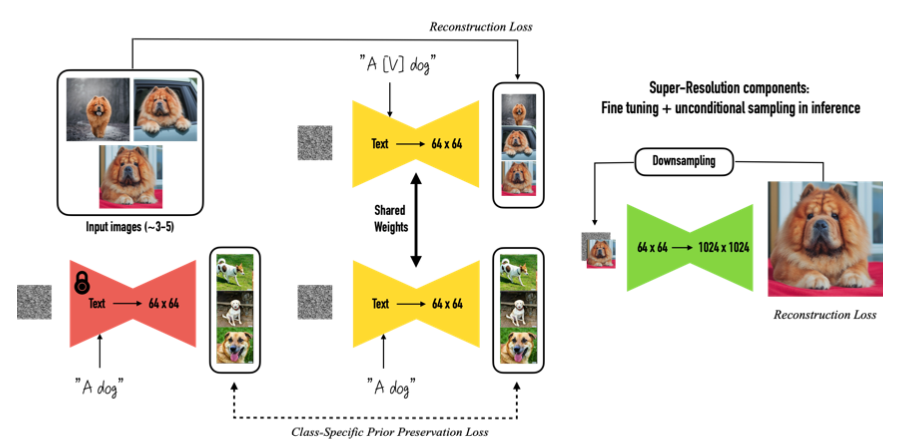
下記がDream Boothのフロー図です。3~5枚の画像(Input Images)を使って、テキストから画像を生成するモデルを2ステップでファインチューニングします。
第1ステップ(左図)はモデルの低解像度部分が対象です。ユニークな識別子を含むテキスト(”A[V]dog”)を入力したら入力画像(Input Images)を出力するように、かつ入力画像が属するクラス名を含むテキスト(”A dog”)を入力したら今まで通りの画像を出力するようにファインチューニングします。
言い換えれば、”A[V]dog”を入力したら入力画像を出力するように、しかも今まで登録した内容には影響を与えないように、辞書登録するようなイメージです。
第2ステップ(右図)はモデルの高解像度部分が対象です。画像とそれを低解像度にしたもののペアを使ってファインチューニングします。
3.コード
この技術は当初30GBを超えるGPUが必要でしたが、有志の方々の努力によって必要メモリの圧縮が行われ、つい最近Google Colabでも動くようになりました。有志の方々には心より感謝致します。今回はこのコードを改造したものを使用しています。
コードはGoogle Colabで動かす形にしてGithubに上げてありますので、それに沿って説明して行きます。自分で動かしてみたい方は、この「リンク」をクリックし表示されたノートブックの先頭にある「Open in Colab」ボタンをクリックすると動かせます。
まず、dream booth をインストールします。
|
1 2 3 4 5 6 |
#@title #**install dreambooth** !wget -q https://github.com/ShivamShrirao/diffusers/raw/main/examples/dreambooth/train_dreambooth.py !wget -q https://github.com/ShivamShrirao/diffusers/raw/main/scripts/convert_diffusers_to_original_stable_diffusion.py %pip install -qq git+https://github.com/ShivamShrirao/diffusers %pip install -q -U --pre triton %pip install -q accelerate transformers ftfy bitsandbytes==0.35.0 gradio natsort safetensors xformers |
今回使用するテキストから画像を生成するモデル(Stable diffusion)をダウンロードするために 、HuggingFace にログインします。
なおログイン前に、HuggingFaceにSign UPし、Model cardの使用申請をし、Access Tokenを取得して置く必要があります。まだの場合は、このブログの「2.アクセス・トークンの取得」を参考に事前に行って下さい。
|
1 2 3 4 5 6 7 |
#@title #**Login to HuggingFace** #@markdown You need to accept the model license before downloading or using the Stable Diffusion weights. Please, visit the [model card](https://huggingface.co/CompVis/stable-diffusion-v1-4), read the license and tick the checkbox if you agree. You have to be a registered user in 🤗 Hugging Face Hub, and you'll also need to use an access token for the code to work. from huggingface_hub import notebook_login !git config --global credential.helper store notebook_login() |
学習の前に、特定のオブジェクト名(INSTANC)と特定のオブジェクトが属するクラス名(CLASS)を設定します。特定のオブジェクト名は、ユニークな名称にし、クラス名は一般的な名称にして下さい。
ここでは、オブジェクト名は「kasumiarimura」、クラス名は「portrait」とします。はい、もうお分かりですね。オブジェクトは、「有村架純」さんを使います。
|
1 2 3 4 5 6 7 8 9 10 11 12 13 14 15 16 17 18 19 20 21 22 23 24 25 26 27 28 29 30 31 32 33 34 35 36 37 38 39 40 41 42 43 44 45 46 47 48 49 50 51 52 53 54 55 56 57 58 59 60 61 62 |
#@title #**setting folder** # define function import os import shutil def reset_folder(path): if os.path.isdir(path): shutil.rmtree(path) os.makedirs(path,exist_ok=True) import matplotlib.pyplot as plt from PIL import Image import numpy as np import os import glob def display_pic(folder): fig = plt.figure(figsize=(30, 60)) files = sorted(glob.glob(folder+'/*.jpg')) for i, file in enumerate(files): img = Image.open(file) images = np.asarray(img) ax = fig.add_subplot(10, 5, i+1, xticks=[], yticks=[]) image_plt = np.array(images) ax.imshow(image_plt) name = os.path.basename(file) ax.set_xlabel(name, fontsize=30) fig.tight_layout() plt.show() plt.close() # setting MODEL_NAME = "CompVis/stable-diffusion-v1-4" INSTANCE = "kasumiarimura"#@param {type:"string"} INSTANCE_DIR = "/content/data/"+INSTANCE reset_folder(INSTANCE_DIR) CLASS = "portrait" #@param {type:"string"} CLASS_DIR = "/content/data/"+CLASS reset_folder(CLASS_DIR) OUTPUT_DIR = "/content/stable_diffusion_weights/" + INSTANCE reset_folder(OUTPUT_DIR) concepts_list = [ { "instance_prompt": INSTANCE, "class_prompt": CLASS, "instance_data_dir": INSTANCE_DIR, "class_data_dir": CLASS_DIR }, ] # `class_data_dir` contains regularization images import json import os for c in concepts_list: os.makedirs(c["instance_data_dir"], exist_ok=True) with open("concepts_list.json", "w") as f: json.dump(concepts_list, f, indent=4) |
オブジェクト画像を自分のPCからアップロードします。このとき使用する画像は正方形のものを使用して下さい。
sample_picsのチェックボックスにチェックを入れていると、サンプル画像(有村架純5枚)をアップロードします。ここでは、チェックを入れた状態で実行します。
|
1 2 3 4 5 6 7 8 9 10 11 12 13 14 15 16 17 |
#@title #**upload pics** import os from google.colab import files import shutil import gdown sample_pics = False #@param {type:"boolean"} if sample_pics: gdown.download('https://drive.google.com/uc?id=1h-41BPpLLLH4bkjqPUeyFmNao8-y7CRw', 'yui.zip', quiet=False) ! unzip -d $INSTANCE_DIR yui.zip else: uploaded = files.upload() for filename in uploaded.keys(): dst_path = os.path.join(INSTANCE_DIR, filename) shutil.move(filename, dst_path) display_pic(INSTANCE_DIR) |

オブジェクト画像とクラス画像(自動的に取得されます)を学習します。20〜30分程度時間がかかるので、しばらくお待ち下さい。
|
1 2 3 4 5 6 7 8 9 10 11 12 13 14 15 16 17 18 19 20 21 22 23 24 |
#@title #**train** (takes 20〜30minutes) !accelerate launch train_dreambooth.py \ --pretrained_model_name_or_path=$MODEL_NAME \ --pretrained_vae_name_or_path="stabilityai/sd-vae-ft-mse" \ --output_dir=$OUTPUT_DIR \ --revision="fp16" \ --with_prior_preservation --prior_loss_weight=1.0 \ --seed=1337 \ --resolution=512 \ --train_batch_size=1 \ --train_text_encoder \ --mixed_precision="fp16" \ --use_8bit_adam \ --gradient_accumulation_steps=1 \ --learning_rate=1e-6 \ --lr_scheduler="constant" \ --lr_warmup_steps=0 \ --num_class_images=50 \ --sample_batch_size=4 \ --max_train_steps=800 \ --save_interval=10000 \ --save_sample_prompt=$CLASS \ --concepts_list="concepts_list.json" |
ファインチューニングしたモデルを元に、テキストから画像を生成するパイプラインを作成します。seed で乱数系列を指定できます。
|
1 2 3 4 5 6 7 8 9 10 11 12 13 14 15 16 17 18 19 20 21 22 23 24 25 26 27 28 |
#@title #**make pipe for generating images** # Specify the weights directory to use (leave blank for latest) WEIGHTS_DIR = "" if WEIGHTS_DIR == "": from natsort import natsorted from glob import glob import os WEIGHTS_DIR = natsorted(glob(OUTPUT_DIR.rstrip(os.sep)+"/*"))[-1] # Inference import torch from torch import autocast from diffusers import StableDiffusionPipeline, DDIMScheduler from IPython.display import display model_path = WEIGHTS_DIR # If you want to use previously trained model saved in gdrive, replace this with the full path of model in gdrive pipe = StableDiffusionPipeline.from_pretrained(model_path, safety_checker=None, torch_dtype=torch.float16).to("cuda") pipe.scheduler = DDIMScheduler.from_config(pipe.scheduler.config) pipe.enable_xformers_memory_efficient_attention() g_cuda = None # seed setting g_cuda = torch.Generator(device='cuda') seed = 52362 #@param {type:"number"} g_cuda.manual_seed(seed) |
それでは、promupt にモデルに登録したオブジェクト名+クラス名(kasumiarimura portrait)をそのままを入力し画像生成してみましょう。一度の実行で10枚画像を生成し、気に入らなければ何度でも繰り返し実行することが出来ます。
|
1 2 3 4 5 6 7 8 9 10 11 12 13 14 15 16 17 18 19 20 21 22 23 24 25 26 27 28 29 30 |
#@title #**manual generat images** reset_folder('images') # prompt prompt = "kasumiarimura portrait" #@param {type:"string"} negative_prompt = "" #@param {type:"string"} # other setting num_samples = 10 guidance_scale = 7.5 num_inference_steps = 50 height = 512 width = 512 with autocast("cuda"), torch.inference_mode(): images = pipe( prompt, height=height, width=width, negative_prompt=negative_prompt, num_images_per_prompt=num_samples, num_inference_steps=num_inference_steps, guidance_scale=guidance_scale, generator=g_cuda ).images for i, img in enumerate(images): img.save('images/'+str(i).zfill(4)+'.jpg') display(img) |
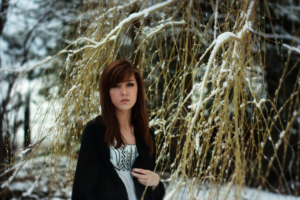
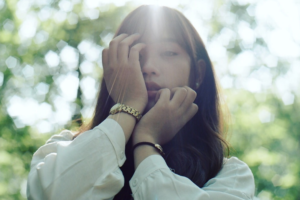
10枚生成した内の2枚を表示しています。sample_picsには無い、指定したオブジェクト(有村架純)の画像が生成されています。

次を実行すると表示した画像をダウンロード出来ます(Google Chrome専用)
|
1 2 3 4 5 6 7 8 |
#@title #**Download images** from google.colab import files if os.path.isfile('data.zip'): os.remove('data.zip') ! zip -r data.zip images files.download('data.zip') |
それでは、色々な呪文を使って、アーティスティックな画像生成をしてみましょう。呪文は6つプリセット(参考Lexica)してあります。スライダーでprompt_bank_No を選択(0〜5)して実行すると10枚の画像を生成します。
まず、「0」で実行します。気に入らなければ何度でも繰り返し実行することが出来ます。
|
1 2 3 4 5 6 7 8 9 10 11 12 13 14 15 16 17 18 19 20 21 22 23 24 25 26 27 28 29 30 31 32 33 34 35 36 37 38 39 40 41 42 43 |
#@title #**auto generat images** # prompt bank p0 = 'XXX profile picture by margaret keane, dynamic pose, intricate, futuristic, fantasy, elegant, by stanley artgerm lau, greg rutkowski, thomas kindkade, alphonse mucha, loish, norman rockwell' p1 = 'Realistic detailed face portrait of a beautiful futuristic italian renaissance queen in opulent alien glass armor by alphonse mucha, XXX, ayami kojima, amano, greg hildebrandt, and mark brooks, female, feminine, art nouveau, ornate italian renaissance cyberpunk, iridescent venetian blown glass, neo - gothic, gothic, character concept design' p2 = 'Photo of a gorgeous XXX in the style of stefan kostic, realistic, sharp focus, 8 k high definition, insanely detailed, intricate, elegant, art by david cronenberg and stanley lau and artgerm' p3 = 'Photo of a gorgeous female in the style of stefan kostic, XXX, realistic, half body shot, sharp focus, 8 k high definition, insanely detailed, intricate, elegant, art by stanley lau and artgerm, extreme blur cherry blossoms background' p4 = 'God and goddess, XXX, white hair, long hair, gorgeous, amazing, elegant, intricate, highly detailed, digital painting, artstation, concept art, sharp focus, illustration, art by artgerm and greg rutkowski and alphonse mucha' p5 = 'Portrait of a military engineer woman with short white hair, XXX, wearing overalls, medium shot, portrait, concept art, natural lighting, illustration, full color, highly detailed, photorealistic, by greg rutkowski, artstation' bank = [p0, p1, p2, p3, p4, p5] reset_folder('images') # prompt name = INSTANCE+' '+CLASS prompt_bank_No = 5 #@param {type:"slider", min:0, max:5, step:1} incantation = bank[prompt_bank_No] prompt = incantation.replace('XXX', name) print('prompt = ', prompt) negative_prompt = "" # other setting num_samples = 10 guidance_scale = 7.5 num_inference_steps = 50 height = 512 width = 512 with autocast("cuda"), torch.inference_mode(): images = pipe( prompt, height=height, width=width, negative_prompt=negative_prompt, num_images_per_prompt=num_samples, num_inference_steps=num_inference_steps, guidance_scale=guidance_scale, generator=g_cuda ).images for i, img in enumerate(images): img.save('images/'+str(i).zfill(4)+'.jpg') display(img) |
「0」です。生成した画像の中から2つ表示しています。

同様に「1」です。生成した画像の中から2つ表示しています。

同様に「2」です。生成した画像の中から2つ表示しています。

同様に「3」です。生成した画像の中から2つ表示しています。

同様に「4」です。生成した画像の中から2つ表示しています。

同様に「5」です。生成した画像の中から2つ表示しています。

先程同様、以下を実行すると表示した画像をダウンロード出来ます(Google Chrome専用)
|
1 2 3 4 5 6 7 8 |
#@title #**Download images** from google.colab import files if os.path.isfile('data.zip'): os.remove('data.zip') ! zip -r data.zip images files.download('data.zip') |
自分で呪文を作ってやってみたい場合は、prompt とnegative_prompt で指定する方で色々試してみて下さい。
なお、新しいオブジェクトを学習する場合は、メモリが一杯一杯なので、リセットを掛けて(ランタイム/ランタイムを接続解除して削除)、最初から行って下さい。
今までお洒落な画像が生成できるものの、自分が狙った通りのオブジェクトが生成できないという悩みを、ある程度解決してくれるソリューションになりそうですね。
では、また。
(オリジナルgithub)https://github.com/ShivamShrirao/diffusers/tree/main/examples/dreambooth
2022.12.1 コスプレをやってみよう
Dream Booth を色々いじっている内に、コスプレが簡単に出来てしまうことに気づきました。例えば、「新垣結衣」さんでやってみましょう。下記の6枚の画像を、オブジェクト名は「yuiaragaki」、クラス名は「portrait」で学習させます。

画像生成に使う文は以下で、XXXのところに適当な単語を当てはめます。写真画像を生成しようとするとアラが目立ちますので、あえてリアルなイラスト画像が生成される文にしています。
Portrait of yuiaragaki as XXX, detailed portrait, realism, 4 k, art by greg rutkowski, alphonse mucha, artistic, trending on artstation, beautiful mural
それでは、画像生成の例をみてみましょう。まず、ビキニのガッキーです。XXX = female swimmer, wearing a bikini swimsuit です。

次に、スーパーマンのガッキーです。XXX = superman です。

次に、ナースのガッキーです。XXX = nurse です。手に何か持たせたい時は、with ○○○ in hands を加えます。

今度は、着物を着たガッキーです。XXX = woman in kimono です。

次に、競泳水着を着たガッキーです。XXX = olympic swimmer in swimsuit です。

次に、フランス料理シェフのガッキーです。XXX = French chef です。

今度は、宇宙飛行士のガッキーです。XXX = NASA astronaut です。

最後に、ポリスのガッキーです。XXX = female police officer です。ピストルを持たせる場合は、with pistol in hands を追加です。

いかがだったでしょうか。まだイラストの域を完全に脱してはいませんが、デジタルで自由自在にコスプレが出来る時代が直ぐそこです。
2023.1.23 コスプレのクオリティを上げよう
学習内容を見直すことでコスプレのクオリティアップを図るコツが分かってきましたので、ご紹介します。
1.学習データを増やします。下記の様に、学習データを部位別(顔、上半身、全身)に一定の比率で収集します。ここでは、合計30枚の画像を顔:上半身:全身=18:9:3の比率にしています(ザックリでいいと思います)。
2.画像は内部で正方形として扱われるため、学習データは正方形に揃えておきます。データを正方形に加工するには、この<サイト>が便利です。
3.学習データ増に伴い、max_train_steps を増やします。1枚当たり100ステップが目安でしょうか。学習データが30枚なら30×100=3,000ステップが目安です。

学習データ30枚だと約1時間弱で学習が完了します。それでは早速、文から画像を生成してみましょう。
ビキニ姿です(yuiaragaki as female swimmer, wearing a bikini swimsuit, at Waikiki Beach, ray tracing, 8k)

ナース姿です(yuiaragaki as nurse wearing a nurse’s white coat, a stethoscope around her neck, ray tracing, 8k)

競泳水着姿です(yuiaragaki as an Olympic swimmer in a swimsuit next to a competitive swimming pool, ray tracing, 8k)

フレンチシェフです(yuiaragaki wears French maid costume at a cafe, ray tracing, 8k)

メイド姿です(yuiaragaki wears French maid costume at a cafe, ray tracing, 8k

警官姿です(yuiaragaki as female police officer, ray tracing, 8k)

(twitter投稿)



いつもブログ拝見させてもらってます。
今回のdream boothの記事ありがとうございます。
一つ質問なんですが、#@title #**make pipe for generating images**のところを実行するとエラーが出てしまいます。
どうすればいいでしょうか?
ご回答いただければ幸いです。
まささん
今ブログのリンクから試したところ正常に動作しました。
昨日、オリジナルgithubのアップデートに伴いコードをアップデートしていますので、それが影響していると思われます。
再度、ブログのリンクから飛んでお試し下さい。
ご回答ありがとうございます。
無事成功しました。
ありがとうございます。
最近ブログを拝見させていただき、浅識ながらも手を動かして試させていただき、大変参考になっております。
質問なのですが、私も#@title #**make pipe for generating images**のところを実行すると、”Error no file named model_index.json found in directory”と表記され、エラーになってしまいます。
上記のご回答にある「ブログのリンク」とはこのページ冒頭に書かれてある「この「リンク」をクリックし表示されたノートブックの先頭にある「Open in Colab」ボタンをクリックすると動かせます。」の部分の認識でよろしいでしょうか?
そちらから試しているのですがうまくいかずです泣
ご回答いただければ幸いです。
Sioさん
ご連絡ありがとうございます。2日前に仕様がアップデートされエラーが発生したようです。コードは見直し済です。ブログのリンクから再度お試しください。
試してみたところうまく出来ました!
お忙しいところ大変ありがとうございました。
cedroさん
StableDiffusion関連のブログをよく拝見させていただき、とても参考にさせていただいてます。
今回のdream boothの記事もありがとうございます。
1つエラーが発生し、解決出来なかったためご教示いただければ幸いです。
pipe().imageのところで、「OutOfMemoryError: CUDA out of memory.」が発生します。
どうすればいいでしょうか?
ご回答いただければ幸いです。
hiroさん
情報ありがとうございます。
エラーは、xformerがpip installになり、それに伴いpipeの設定が変更になったためです。すでに修正済みですので、新たにリンクから実行してみて下さい。
cedroさん
エラーが解消し、画像生成することができました。
本件のご対応、並びにいつも有益な情報の提供ありがとうございます。
今後の活動も応援しております。
cedroさん
画像生成についてアイデアをいただきたく、再度コメントさせていただきます。
例えば対象オブジェクトの赤ちゃんのイラストを作成したい場合は、
promptの調整を頑張るしかないでしょうか?
※今回の件で言うと、有村さんや新垣さんの赤ちゃんのイラスト(哺乳瓶を持ったなど)
※ex.) prompt = ‘a XXX cartoon character of a baby drawn in studio ghibli style’
わかりやすい解説をありがとうございます。
作成されたモデルデータの保存はどこにされているのでしょか?
ご教示いただけましたら幸いです。
CPXさん
stable_diffusion_weightsフォルダーの中に作成されます。但し形式は、ckptではありません。