今回は、keras のサンプルプログラムを使って、英語を日本語に翻訳してみたいと思います。
こんにちは cedro です。
最近、自然言語処理にはまってます。ところで、Seq2Seq(Sequece to Sequence)というモデルをご存知でしょうか。seq2seq は、系列を入力として系列を出力するモデルです。
例えば、英語の単語の系列を受け取り、それと同じ意味のフランス語の単語の系列を出力すれば、英仏の翻訳が出来ます。また、日本語の単語の系列を受け取り、それに応答する日本語の単語の系列を出力すれば、チャットボットの様な事が出来ます。
ということで、今回は、keras のサンプルプログラムを使って、英語を日本語に翻訳してみたいと思います。
データセットを準備します
今回使うサンプルプログラムは、lstm_seq2seq.py でオリジナルは英語をフランス語に翻訳する仕様になっています。ただ、私にとっては、英語の理解でさえ怪しいのにフランス語に翻訳されても適切かどうかは判断しようがない、正に猫に小判状態。なので、英語を日本語に翻訳する仕様に変更してやってみたい。
英日翻訳の仕様に変更するには、学習のためのデータセットを英仏から英日に変更すれば良いわけですが、そんな都合の良いものがあるのかというと、ちゃんとあるんです!

実は、英仏のデータセットが置いてある、Tab-delimited Bilingual Sentence Pairs というホームページに、英日のデータセット( jpn-eng.zip )も置いてあるので、それをダウンロードしてサンプルプログラムと同じフォルダーに置けば、英日翻訳の仕様に変更できます。。
サンプルプログラムは、1文字単位の処理をしていますので、日本語を使っていても形態素解析などをする必要などなく、英日のデータセットをそのまま使えるわけです。便利ですね。
プログラムを見てみます
|
1 2 3 4 5 6 7 8 9 10 11 12 13 14 15 16 17 18 19 20 21 22 23 24 25 26 27 28 29 30 31 32 33 34 35 36 37 38 39 40 41 42 43 44 45 46 47 48 |
from __future__ import print_function from keras.models import Model from keras.layers import Input, LSTM, Dense import numpy as np batch_size = 64 # Batch size for training. epochs = 100 # Number of epochs to train for. latent_dim = 256 # Latent dimensionality of the encoding space. num_samples = 10000 # Number of samples to train on. # Path to the data txt file on disk. data_path = 'jpn-eng/jpn.txt' # 英日データセットを読み込む # Vectorize the data. input_texts = [] target_texts = [] input_characters = set() target_characters = set() with open(data_path, 'r', encoding='utf-8') as f: lines = f.read().split('\n') for line in lines[: min(num_samples, len(lines) - 1)]: input_text, target_text = line.split('\t') # We use "tab" as the "start sequence" character # for the targets, and "\n" as "end sequence" character. target_text = '\t' + target_text + '\n' input_texts.append(input_text) target_texts.append(target_text) for char in input_text: if char not in input_characters: input_characters.add(char) for char in target_text: if char not in target_characters: target_characters.add(char) input_characters = sorted(list(input_characters)) target_characters = sorted(list(target_characters)) num_encoder_tokens = len(input_characters) num_decoder_tokens = len(target_characters) max_encoder_seq_length = max([len(txt) for txt in input_texts]) max_decoder_seq_length = max([len(txt) for txt in target_texts]) print('Number of samples:', len(input_texts)) print('Number of unique input tokens:', num_encoder_tokens) print('Number of unique output tokens:', num_decoder_tokens) print('Max sequence length for inputs:', max_encoder_seq_length) print('Max sequence length for outputs:', max_decoder_seq_length) |
16行目からデータセットをベクトル化する準備です。input_texts には英文が順次格納され、target_textsにはそれを翻訳した日本文が順次格納されます。input_characters には英文に使われている文字の種類が格納され、target_characters には日本文に使われている文字の種類が格納されます。
input_texts = [ … ‘ Tom caught a big fish. ‘, … ]
target_texts = [ … ‘ \tトムは大きな魚を捕まえた。\n ‘, … ]
input_characters = [ … ‘ A ‘, ‘ B ‘, ‘ C ‘, ‘ D ‘, … ]
target_characters = [ … ‘ あ ‘, ‘ い ‘, ‘ う ‘, ‘ え ‘, … ]
|
1 2 3 4 5 6 7 8 9 10 11 12 13 14 15 16 17 18 19 20 21 22 23 24 25 26 27 |
input_token_index = dict( [(char, i) for i, char in enumerate(input_characters)]) target_token_index = dict( [(char, i) for i, char in enumerate(target_characters)]) encoder_input_data = np.zeros( (len(input_texts), max_encoder_seq_length, num_encoder_tokens), dtype='float32') decoder_input_data = np.zeros( (len(input_texts), max_decoder_seq_length, num_decoder_tokens), dtype='float32') decoder_target_data = np.zeros( (len(input_texts), max_decoder_seq_length, num_decoder_tokens), dtype='float32') for i, (input_text, target_text) in enumerate(zip(input_texts, target_texts)): for t, char in enumerate(input_text): encoder_input_data[i, t, input_token_index[char]] = 1. for t, char in enumerate(target_text): # decoder_target_data is ahead of decoder_input_data by one timestep decoder_input_data[i, t, target_token_index[char]] = 1. if t > 0: # decoder_target_data will be ahead by one timestep # and will not include the start character. decoder_target_data[i, t - 1, target_token_index[char]] = 1. |
辞書を作成し、データをベクトル化する部分です。2−5行目で、input_characters から辞書 input_token_index を作成し、target_characters から辞書 target_token_index を作成します。
input_token_index = { … ‘ A ‘: 20, ‘ B ‘: 21, ‘ C ‘: 22, ‘ D ‘: 23, … }
target_token_index = { … ‘ あ ‘: 45, ‘ い ‘: 46, ‘ う ‘: 47, ‘ え ‘: 48, … }
7行目からがデータをベクトル化する部分です。encoder_input_data は英文のベクトルデータ、decoder_input_data は日本文のベクトルデータ、decoder_target_data は日本文を1文字づつ予測するベクトルデータが格納されます。
|
1 2 3 4 5 6 7 8 9 10 11 12 13 14 15 16 17 18 19 20 21 22 23 24 25 26 27 28 29 30 31 32 33 34 35 |
# Define an input sequence and process it. encoder_inputs = Input(shape=(None, num_encoder_tokens)) encoder = LSTM(latent_dim, return_state=True) encoder_outputs, state_h, state_c = encoder(encoder_inputs) # We discard `encoder_outputs` and only keep the states. encoder_states = [state_h, state_c] # Set up the decoder, using `encoder_states` as initial state. decoder_inputs = Input(shape=(None, num_decoder_tokens)) # We set up our decoder to return full output sequences, # and to return internal states as well. We don't use the # return states in the training model, but we will use them in inference. decoder_lstm = LSTM(latent_dim, return_sequences=True, return_state=True) decoder_outputs, _, _ = decoder_lstm(decoder_inputs, initial_state=encoder_states) decoder_dense = Dense(num_decoder_tokens, activation='softmax') decoder_outputs = decoder_dense(decoder_outputs) # Define the model that will turn # `encoder_input_data` & `decoder_input_data` into `decoder_target_data` model = Model([encoder_inputs, decoder_inputs], decoder_outputs) # Run training model.compile(optimizer='rmsprop', loss='categorical_crossentropy') model.summary() # ターミナルにモデル表示 from keras.utils import plot_model # モデル可視化モジュールのインポート plot_model(model, to_file = "lstm_seq2seq.png", show_shapes = True) # モデル保存 model.fit([encoder_input_data, decoder_input_data], decoder_target_data, batch_size=batch_size, epochs=epochs, validation_split=0.2) # Save model model.save('s2s.h5') |
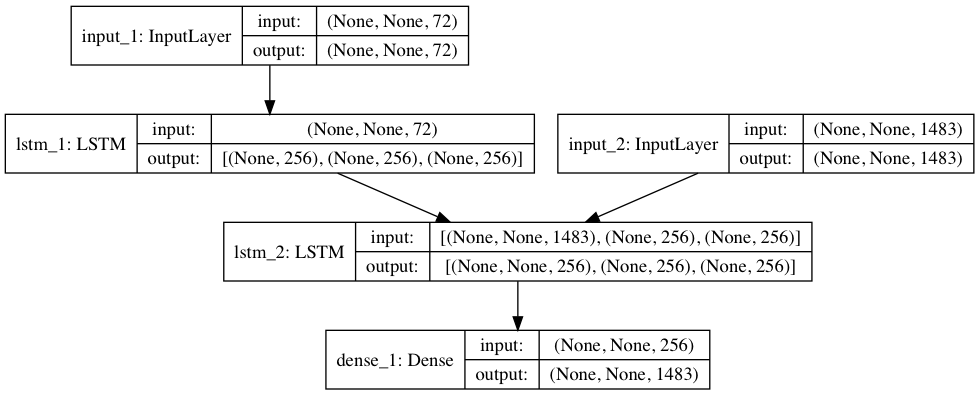
モデル構築と学習をする部分です。26行目はターミナルにモデル表示する命令を追加。27–28行目で、モデル可視化モジュールをインポートし、モデルを’ lstm_seq2seq.png ‘ で保存するために追加してます(但し、pydot と graphviz を事前にインストールしておく必要があります)。

lstm_seq2seq.png を表示させたものです。モデルはLSTMモジュールを2つ使っています。lstm_1 は input_1 から英文を文字単位の系列で受け取り学習します。lstm_2 は lstm_1 の結果(学習した重み)を受け取ると共に、input_2 からその英文を翻訳した日本語文を文字単位の系列で受け取り学習します。
29行目から学習の開始です。
|
1 2 3 4 5 6 7 8 9 10 11 12 13 14 15 16 17 18 19 20 21 22 23 24 25 26 27 28 29 30 31 32 33 34 35 36 37 38 39 40 41 42 43 44 45 46 47 48 49 50 51 52 53 54 55 56 57 58 59 60 61 62 63 64 65 66 67 68 69 |
# Define sampling models encoder_model = Model(encoder_inputs, encoder_states) decoder_state_input_h = Input(shape=(latent_dim,)) decoder_state_input_c = Input(shape=(latent_dim,)) decoder_states_inputs = [decoder_state_input_h, decoder_state_input_c] decoder_outputs, state_h, state_c = decoder_lstm( decoder_inputs, initial_state=decoder_states_inputs) decoder_states = [state_h, state_c] decoder_outputs = decoder_dense(decoder_outputs) decoder_model = Model( [decoder_inputs] + decoder_states_inputs, [decoder_outputs] + decoder_states) # Reverse-lookup token index to decode sequences back to # something readable. reverse_input_char_index = dict( (i, char) for char, i in input_token_index.items()) reverse_target_char_index = dict( (i, char) for char, i in target_token_index.items()) def decode_sequence(input_seq): # Encode the input as state vectors. states_value = encoder_model.predict(input_seq) # Generate empty target sequence of length 1. target_seq = np.zeros((1, 1, num_decoder_tokens)) # Populate the first character of target sequence with the start character. target_seq[0, 0, target_token_index['\t']] = 1. # Sampling loop for a batch of sequences # (to simplify, here we assume a batch of size 1). stop_condition = False decoded_sentence = '' while not stop_condition: output_tokens, h, c = decoder_model.predict( [target_seq] + states_value) # Sample a token sampled_token_index = np.argmax(output_tokens[0, -1, :]) sampled_char = reverse_target_char_index[sampled_token_index] decoded_sentence += sampled_char # Exit condition: either hit max length # or find stop character. if (sampled_char == '\n' or len(decoded_sentence) > max_decoder_seq_length): stop_condition = True # Update the target sequence (of length 1). target_seq = np.zeros((1, 1, num_decoder_tokens)) target_seq[0, 0, sampled_token_index] = 1. # Update states states_value = [h, c] return decoded_sentence for seq_index in range(2000): # Take one sequence (part of the training set) # for trying out decoding. input_seq = encoder_input_data[seq_index: seq_index + 1] decoded_sentence = decode_sequence(input_seq) print('-') print('Input sentence:', input_texts[seq_index]) print('Decoded sentence:', decoded_sentence) |
英文に対応した日本文を生成する部分です。3–14行目はサンプリングモデルの構築(学習の時と同様です)、18–21行目は逆引き辞書の作成。
reverse_input_char_index = { … 20: ‘ A ‘, 21: ‘ B ‘, 22: ‘ C ‘, 23: ‘ D ‘, … }
reverse_target_char_index = { … 45: ‘ あ ‘, 46: ‘ い ‘, 47: ‘ う ‘, 48: ‘ え ‘, … }
23–58行目は、英文の入力から日本文を予測する関数の定義です。
61行目でデータセットの最初から何番目までの英文を翻訳するかを設定しています。オリジナルは100ですが、これでは極めて初歩的な文なので、2000に設定しています。
プログラムを動かしてみます
プログラムは、私の MacbookAir で動かすと、175sec / epoch で 100 epoch 動かすのに約5時間弱といったところ。少し時間は掛かりますが、ノートパソコンでも、やれるレベルだと思います。

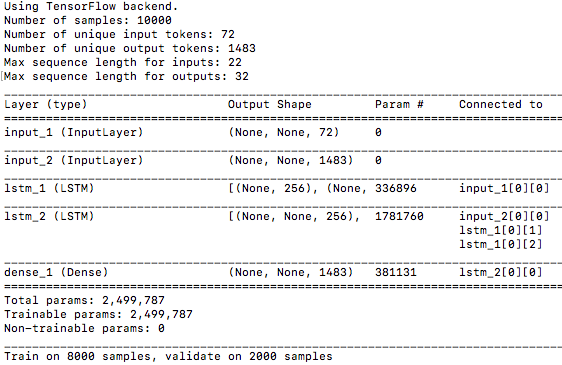
プログラムを起動させた時の初期画面です。Number of unique input tokens は英文なので 72 種類と少ないですが、Number of unique output tokens は日本文なので1483 種類とかなり多いです。
model.summary() の表示は、単純なSequential モデルとは違って、Connected to という項目が追加され、各モジュールの接続状況を表示しています。
10000個のデータセットの内、8000個を学習に、2000個を評価に使う設定です。

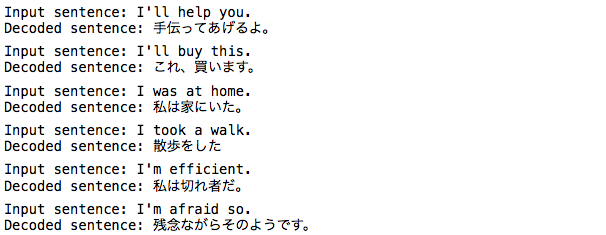
英文を日本語に翻訳した出力の一部です。実は、サンプルプログラムの設定は、データセットで学習した英文をそのまま日本語訳させているので、上手くいって当たり前という気もします。しかし、10000個の英文と和訳のデータセットをLSTMの256個の隠れ層の重みだけで学習しているわけですから、これは凄いことです。
ディープラーニングを使って機械翻訳というのは、こういうイメージなのかなと少し分かった気がします。
では、また。


コメントを残す