1.はじめに
以前、画像をアニメ化する手法として「White box Cartoonization」や「AnimeGANv2」、そして少数のアニメデータだけで顔画像をアニメ化する手法として「Few shot gan adaptation」をご紹介しました。しかし、これらは1つの顔画像から生成されるのは1種類のアニメ顔だけです。
今回、ご紹介するのは、1つの顔画像に対して様々なアニメ顔を生成できる GANs N’ Roses という技術です。ちなみに、この名称はアメリカのロックバンド、ガンズ・アンド・ローゼズの名称を捩っていて面白いですね。
2.GANs N’ Roses とは?
GANs N’ Roses は、同じ顔画像が入力されても様々なアニメ顔を生成するために、画像生成に使用するデータを表情や顔の位置を表す「コンテンツ」とアニメの種類を表す「スタイル」に分離して考えます。
分離するためのロジックは、顔画像をデータ拡張したときに変化するものが「コンテンツ」で変化しないものが「スタイル」です。
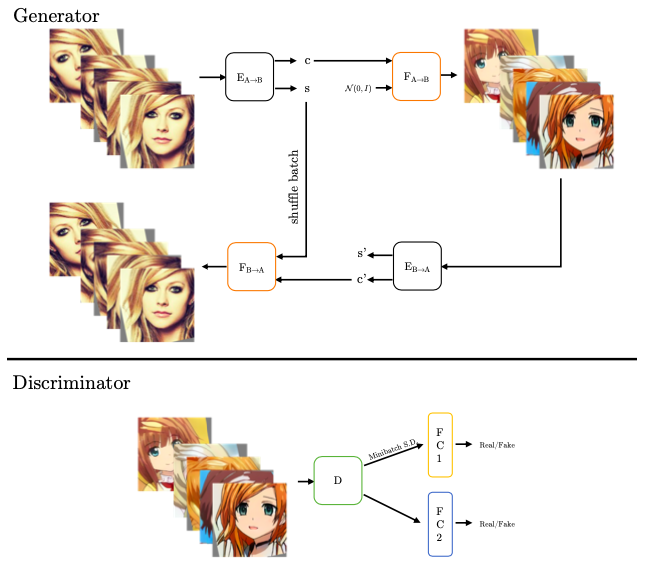
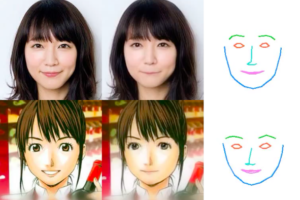
下記は、GANs N’ Roses のフレームワークを示したものです。Gnerator では、入力した顔画像をデータ拡張してバッチを作成し、エンコーダー(左上)でコンテンツ(c)とスタイル(s)をマッピングします。デコーダー(右上)は、コンテンツのみを受け取り様々なスタイルでアニメを生成します。そして生成したアニメをエンコーダ(右下)でコンテンツとスタイルにマッピングし、デコーダー(左下)でコンテンツのみ受けとり入力画像のスタイルで顔画像に戻します。
Discriminator は、アニメの多様性を確保するために、通常の識別誤差の他にミニバッチの標準偏差も計算しています。
早速、コードを動かしてみましょう。
3.コード
コードはGoogle Colabで動かす形にしてGithubに上げてありますので、それに沿って説明して行きます。自分で動かしてみたい方は、この「リンク」をクリックし表示されたノートブックの先頭にある「Colab on Web」ボタンをクリックすると動かせます。
まず、セットアップを行います。
|
1 2 3 4 5 6 7 8 9 10 11 12 13 14 15 16 17 18 19 20 21 22 23 24 25 26 27 28 29 30 31 32 33 34 35 36 37 38 39 40 41 42 43 44 45 46 47 48 49 50 51 52 53 54 55 56 57 |
# githubからコードを取得 !git clone https://github.com/cedro3/GANsNRoses.git %cd GANsNRoses !pip install tqdm gdown kornia scipy opencv-python dlib moviepy lpips aubio ninja # ライブラリーのインポート import os import numpy as np import torch from torch import nn from torch.nn import functional as F from torch.utils import data from torchvision import transforms, utils from tqdm import tqdm torch.backends.cudnn.benchmark = True import copy from util import * from PIL import Image from model import * import moviepy.video.io.ImageSequenceClip import scipy import cv2 import dlib import kornia.augmentation as K from aubio import tempo, source from IPython.display import HTML from base64 import b64encode from google.colab import files # 初期設定 device = 'cuda' latent_dim = 8 n_mlp = 5 num_down = 3 G_A2B = Generator(256, 4, latent_dim, n_mlp, channel_multiplier=1, lr_mlp=.01,n_res=1).to(device).eval() ensure_checkpoint_exists('GNR_checkpoint.pt') ckpt = torch.load('GNR_checkpoint.pt', map_location=device) G_A2B.load_state_dict(ckpt['G_A2B_ema']) # mean latent truncation = 1 with torch.no_grad(): mean_style = G_A2B.mapping(torch.randn([1000, latent_dim]).to(device)).mean(0, keepdim=True) test_transform = transforms.Compose([ transforms.Resize((256, 256)), transforms.ToTensor(), transforms.Normalize(mean=(0.5, 0.5, 0.5), std=(0.5, 0.5, 0.5), inplace=True) ]) |
最初に、画像からアニメを生成してみましょう。下記のコードで画像から顔画像を切り出します。
2行目で画像を指定していますので、Samplesにあるjpg画像から選んで下さい。自分で用意した画像を使う場合は、画像を PC から Samples フォルダーへドラッグ&ドロップでアップロードしてから、画像を指定すればOKです。
|
1 2 3 4 5 6 7 8 9 10 11 12 13 14 15 16 |
# 画像から顔画像を切り出す image = cv2.imread('samples/001.jpg') # 画像指定 height, width = image.shape[:2] # Detect with dlib face_detector = dlib.get_frontal_face_detector() gray = cv2.cvtColor(image, cv2.COLOR_BGR2GRAY) # grab first face face = face_detector(gray, 1)[0] # Face crop with dlib and bounding box scale enlargement x, y, size = get_boundingbox(face, width, height) cropped_face = image[y:y+size, x:x+size] cropped_face = cv2.cvtColor(cropped_face, cv2.COLOR_BGR2RGB) cropped_face = Image.fromarray(cropped_face) cropped_face |
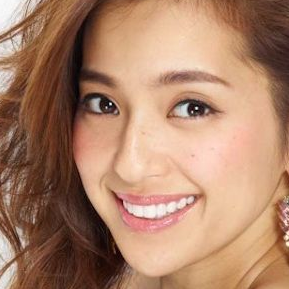
これは、指定した画像から顔画像を切り出した結果です。
続いて、顔画像と同じコンテンツでスタイルの異なるアニメを生成します。
|
1 2 3 4 5 6 7 8 9 10 11 12 13 14 15 16 17 18 19 |
%matplotlib inline plt.rcParams['figure.dpi'] = 200 torch.manual_seed(84986) num_styles = 5 style = torch.randn([num_styles, latent_dim]).to(device) # real_A = Image.open('./samples/margot_robbie.jpg') real_A = cropped_face real_A = test_transform(real_A).unsqueeze(0).to(device) with torch.no_grad(): A2B_content, _ = G_A2B.encode(real_A) fake_A2B = G_A2B.decode(A2B_content.repeat(num_styles,1,1,1), style) A2B = torch.cat([real_A, fake_A2B], 0) display_image(utils.make_grid(A2B.cpu(), normalize=True, range=(-1, 1), nrow=10)) |

今度は、任意の2つのスタイルを補完するアニメを生成してみます。
|
1 2 3 4 5 6 7 8 9 10 11 12 13 14 15 16 17 18 |
torch.manual_seed(13421) real_A = cropped_face real_A = test_transform(real_A).unsqueeze(0).to(device) style1 = G_A2B.mapping(torch.randn([1, latent_dim]).to(device)) style2 = G_A2B.mapping(torch.randn([1, latent_dim]).to(device)) with torch.no_grad(): A2B = [] A2B_content, _ = G_A2B.encode(real_A) for i in np.linspace(0,1,5): new_style = i*style1 + (1-i)*style2 fake_A2B = G_A2B.decode(A2B_content, new_style, use_mapping=False) A2B.append(torch.cat([fake_A2B], 0)) A2B = torch.cat([real_A] + A2B, 0) display_image(utils.make_grid(A2B.cpu(), normalize=True, range=(-1, 1), nrow=10)) |

次にビデオでやってみましょう。ビデオから顔画像をクロップし、それに合わせて色々なスタイルのアニメを生成します。クロップ位置は、最初のフレームで決定するので、顔の位置があまり変化しないビデオを選んで下さい。
ビデオの指定は、5行目で行っています。自分が用意したビデオを使う場合は、ビデオを PC から Samples フォルダーにドラッグ&ドロップでアップロードして、ビデオの指定を変更して下さい。
なお、ビデオからアニメを生成するモードは、'normal', 'blend', 'beat', 'eig' と4種類あるので、色々試してみて下さい。ここでは、'beat' を選んでいます。
|
1 2 3 4 5 6 7 8 9 10 11 12 13 14 15 16 17 18 19 20 21 22 23 24 25 26 27 28 29 30 31 32 33 34 35 36 37 38 39 40 41 42 43 44 45 46 47 48 49 50 51 52 53 54 55 56 57 58 59 60 61 62 63 64 65 66 67 68 69 70 71 72 73 74 75 76 77 78 79 80 81 82 83 84 85 86 87 88 89 90 91 92 93 94 95 96 97 98 99 100 101 102 103 104 105 106 107 108 109 110 111 112 113 114 115 116 117 118 119 120 121 122 123 124 125 126 127 128 129 130 131 132 133 134 135 136 137 |
import random import scipy.ndimage # input video inpath = './samples/satomi.mp4' # ビデオ指定 outpath = './samples/output.mp4' mode = 'beat' # モード選択 assert mode in ('normal', 'blend', 'beat', 'eig') # Frame numbers and length of output video start_frame=0 end_frame=None frame_num = 0 mp4_fps= 30 faces = None smoothing_sec=.7 eig_dir_idx = 1 # first eig isnt good so we skip it frames = [] reader = cv2.VideoCapture(inpath) num_frames = int(reader.get(cv2.CAP_PROP_FRAME_COUNT)) # get beats from audio win_s = 512 # fft size hop_s = win_s // 2 # hop size s = source(inpath, 0, hop_s) samplerate = s.samplerate o = tempo("default", win_s, hop_s, samplerate) delay = 4. * hop_s # list of beats, in samples beats = [] # total number of frames read total_frames = 0 while True: samples, read = s() is_beat = o(samples) if is_beat: this_beat = int(total_frames - delay + is_beat[0] * hop_s) beats.append(this_beat/ float(samplerate)) total_frames += read if read < hop_s: break #print len(beats) beats = [math.ceil(i*mp4_fps) for i in beats] if mode == 'blend': shape = [num_frames, 8, latent_dim] # [frame, image, channel, component] #all_latents = random_state.randn(*shape).astype(np.float32) all_latents = np.random.randn(*shape).astype(np.float32) all_latents = scipy.ndimage.gaussian_filter(all_latents, [smoothing_sec * mp4_fps, 0, 0], mode='wrap') all_latents /= np.sqrt(np.mean(np.square(all_latents))) all_latents = torch.from_numpy(all_latents).to(device) else: all_latents = torch.randn([8, latent_dim]).to(device) if mode == 'eig': all_latents = G_A2B.mapping(all_latents) in_latent = all_latents # Face detector face_detector = dlib.get_frontal_face_detector() assert start_frame < num_frames - 1 end_frame = end_frame if end_frame else num_frames while reader.isOpened(): _, image = reader.read() if image is None: break if frame_num < start_frame: continue # Image size height, width = image.shape[:2] # 2. Detect with dlib if faces is None: gray = cv2.cvtColor(image, cv2.COLOR_BGR2GRAY) faces = face_detector(gray, 1) if len(faces): # For now only take biggest face face = faces[0] # --- Prediction --------------------------------------------------- # Face crop with dlib and bounding box scale enlargement x, y, size = get_boundingbox(face, width, height) cropped_face = image[y:y+size, x:x+size] cropped_face = cv2.cvtColor(cropped_face, cv2.COLOR_BGR2RGB) cropped_face = Image.fromarray(cropped_face) frame = test_transform(cropped_face).unsqueeze(0).to(device) with torch.no_grad(): A2B_content, A2B_style = G_A2B.encode(frame) if mode == 'blend': in_latent = all_latents[frame_num] elif mode == 'normal': in_latent = all_latents elif mode == 'beat': if frame_num in beats: in_latent = torch.randn([8, latent_dim]).to(device) if mode == 'eig': if frame_num in beats: direction = 3 * eigvec[:, eig_dir_idx].unsqueeze(0).expand_as(all_latents).to(device) in_latent = all_latents + direction eig_dir_idx += 1 fake_A2B = G_A2B.decode(A2B_content.repeat(8,1,1,1), in_latent, use_mapping=False) else: fake_A2B = G_A2B.decode(A2B_content.repeat(8,1,1,1), in_latent) fake_A2B = torch.cat([fake_A2B[:4], frame, fake_A2B[4:]], 0) fake_A2B = utils.make_grid(fake_A2B.cpu(), normalize=True, range=(-1, 1), nrow=3) #concatenate original image top fake_A2B = fake_A2B.permute(1,2,0).cpu().numpy() frames.append(fake_A2B*255) frame_num += 1 clip = moviepy.video.io.ImageSequenceClip.ImageSequenceClip(frames, fps=mp4_fps) # save to temporary file. hack to make sure ffmpeg works clip.write_videofile('./temp.mp4') # use ffmpeg to add audio to video !ffmpeg -i ./temp.mp4 -i $inpath -c copy -map 0:v:0 -map 1:a:0 $outpath -y !rm ./temp.mp4 |
|
1 2 3 4 5 6 7 |
mp4 = open(outpath,'rb').read() data_url = "data:video/mp4;base64," + b64encode(mp4).decode() HTML(""" <video width=400 controls> <source src="%s" type="video/mp4"> </video> """ % data_url) |

では、また。
(オリジナルgithub)https://github.com/mchong6/GANsNRoses







cedroさん、
新しいトピックを更新いただきましてありがとうございます。
無事動作したことをご報告いたします。
理解が追いつかず、ただ感嘆しながら眺めております。(あくまで理解力の問題です。)
かつさん
コメントありがとうございます。
無事動作してよかったです。今後ともよろしくお願いします。